Showing posts with label DIY. Show all posts

Wednesday, December 1, 2021

December Club Couture - Good Things // Come Chalk with Me!


The December 2021 Club Couture™ Transfer is a great way to kick off your new year, sending vibes for good things to happen in 2022. For new chalkers and those who prefer a more simple project, this Chalk Transfer® design looks amazing chalked all in one color. For meticulous crafters and those who like to take things above and beyond, it’s a great chance to show off detail work, adding different hues to the design.

We’re showing off a bit here with a busier design; make it pop with a surface sized to allow a bit of empty space in the border around it. We’ve chosen to add our old staple Bright White (item P181121). The subscription includes Chalkology® Paste Singles in Couture Teal, Eucalyptus, and Peachy Keen, which can be used here or saved for future projects.

No matter how you chalk it, good things are going to happen!

Supplies Included

Club Couture Transfer: Good Things—December Club Couture Chalkology® Paste Singles: Couture Teal, Eucalyptus, Peachy Keen
Additional Supplies Needed

Surface: Sylvie White Frame (9" × 12") Chalkology® Paste: Bright White

Tools: Color Trays, Fuzzing Cloth, Detail Tool, Multi-Tool, Mini Squeegee

Color and Placement Suggestions

Bright White (additional paste): swirls, “good,” “things,” “happen” Eucalyptus: greenery, “are going to”
Peachy Keen: accent flowers, banner dashes


Follow these instructions to complete this project:

1. Remove your Transfer from its packaging and carefully peel off the Transfer Backer Sheet.

2. “Fuzz” the Transfer by gently pressing onto a Fuzzing Cloth and carefully pulling it upward. This will make the Transfer easier to remove from the surface after you’ve applied the paste.

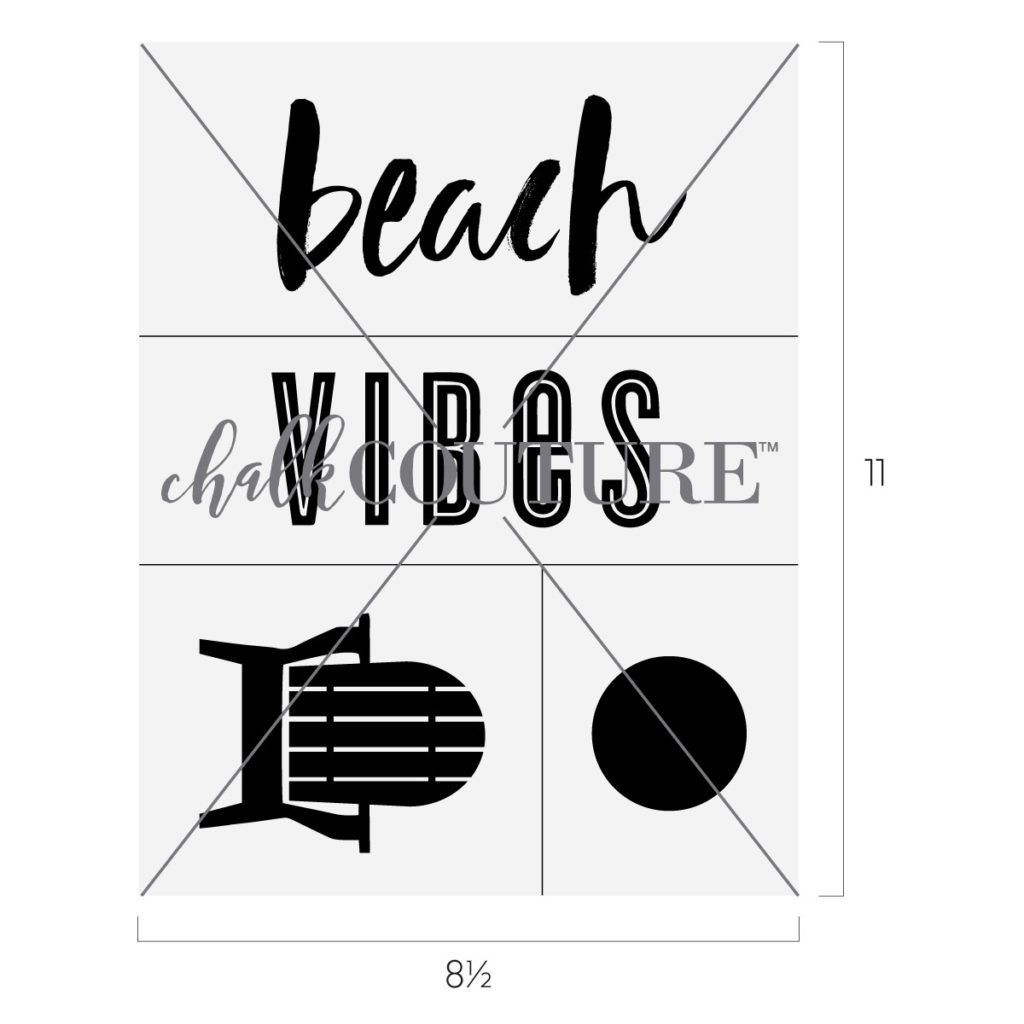
3. Center the Good Things Transfer on the surface and smooth it out to ensure it has properly adhered and that there are no bubbles or wrinkles.

4. Knead your Chalkology Paste Singles. Cut open the corner of each packet and squeeze the desired amount of paste onto a Color Tray, using a new tray for each color.

5. With the curved edge of your Multi-Tool, thoroughly mix your jar of Bright White Chalkology Paste and scrape excess paste from the jar sides.

6. Use your Mini Squeegee, Multi-Tool, and Detail Tool to apply color over your Transfer (see “Color and Placement Suggestions”). Select your tool based on whichever size best fits the various Transfer elements. Once the screen portions of the design are completely covered, use your tools to remove excess paste as evenly as possible; excess paste can be scraped back into the tray or jar. The more excess paste you remove, the better the result will be.

7. For best results, divide your project into sections and use the chalk-and-pull method. This allows you to work in smaller sections without having the paste dry in the screen, which would give you patchy results. Chalk the top section of the design and peel back only that portion of the Transfer to let the paste dry on the surface before continuing (use the Quick Dry Tool for a fast dry). To prevent any stretching in the Transfer, peel from the center or from both corners, instead of peeling diagonally.

8. Gently lay the Transfer back down over the chalked section. Ensure that the next section is fully adhered, and repeat these steps as you work your way down the Transfer.

9. Once your design is fully chalked and before the paste dries, remove your Transfer from the surface and immediately clean the Transfer with cool water (do not let it soak).

10. Dry the Transfer flat with the sticky side up. Once completely dry, reapply the Transfer Backer Sheet and store flat.

11. Show off your latest DIY project to friends and family. And remember, good things are going to happen!

Want to see a quick Video on how it is done? 

Watch this:

Not a Club Member yet?

Love your Club Couture membership, but want more to use them on? Get a Best Basics Chalk It Up Kit

Our basic instructions go like this: choose a surface and Transfer, add some paste or ink, and start creating. With the Best Basics Chalk It Up Kit, you’ll have what you need to carry out those instructions and you’ll be well on your way to artistry!

This kit includes two of our favorite surfaces: Board & Base (perfect for A-sized Transfers) and a Sylvie White Frame (perfect for B-sized Transfers). Both surfaces are reusable with Chalkology Paste, and can be used in either landscape or portrait orientation. Plus, that Board & Base is reversible so you can have two projects to display all at once!

Are you ready for a new year? I know I am! Let's hope for the best year yet! 

 Do you make stuff for your home? Let me know! I would love to hear all about it! 

What Is Chalk Couture?: https://youtu.be/nyosBF7gSxo
See how to create with Chalk Couture: https://youtu.be/jHLd2P2zqWo

SAVE 40% OFF EVERYTHING & JOIN MY TEAM AS A DESIGNER: 
What Is In The Kit: https://youtu.be/qiVdqk2RDdw

JOIN MY CLUB COUTURE & GET EXCLUSIVE PERKS: 
EXCLUSIVE DISCOUNT: 25% OFF, Happy Mail, Exclusive Lives, Art Giveaways, and other benefits


Like these but not sure what Chalk Couture is- Click here to read all about it! 


Wanna shop for some Chalk Couture stuff? Click here to check out all the amazing items! 


And as always, help a sister out by sharing this post, like it and leave me a comment! 

Until then...


Sunday, September 19, 2021

Chevron Pumpkin Shelf Leaner is now in my Etsy Shop // Go check it out!

I just added the Chevron Pumpkin Shelf Leaner to my Etsy Shop! It's so cute and can be used for Fall and Halloween. 

This comes with 2 options: Painted by me or buy as a DIY Kit. 

If you buy it painted by me, it comes with a Matte Black Round Base with a Chevron print scored into it. Then there is a Orange Pumpkin placed in the middle of the base, giving it a 3D feel. 

If you buy the DIY Kit, you get each piece unfinished. That way you can paint it whatever colors you want to match your home decor. The Round Base is blank on the back. The pumpkin has an adhesive with a peel off backing so its easy to adhere onto the base. That means you don't have to worry about glue! I've got you covered! There is also 2 sponges include to paint each piece. Using a sponge to apply paint is an easy way and it leaves it without brush strokes. Paint is not included but can be purchased cheap at Target, Walmart, Amazon, Hobby Lobby, Joanns, Michaels or any craft store. You can even you paint from around the house! 

These pieces are shelf leaners, which means they are meant to lean against something. It could lean on a 3 tiered tray or on a mantle. The possibilities are endless. 

Check them out here:

Here are the 2 options: Painted and DIY Kit.


The Painted Finished item is painted matte black with a chevron patterned. Then finished off a orange pumpkin on top. This item is 4.227" wide by 4.259" length. It has a 1/4" total height.


The DIY Kit, you get each piece unfinished. That way you can paint it whatever colors you want to match your home decor. The Round Base is blank on the back. The pumpkin has an adhesive with a peel off backing so its easy to adhere onto the base. That means you don't have to worry about glue! I've got you covered! There is also 2 sponges include to paint each piece. Using a sponge to apply paint is an easy way and it leaves it without brush strokes. Paint is not included but can be purchased cheap at Target, Walmart, Amazon, Hobby Lobby, Joanns, Michaels or any craft store.


Now the only question: Which one is your favorite? 

Do you make stuff for your home? Let me know! I would love to hear all about it! 

What Is Chalk Couture?: https://youtu.be/nyosBF7gSxo
See how to create with Chalk Couture: https://youtu.be/jHLd2P2zqWo

SAVE 40% OFF EVERYTHING & JOIN MY TEAM AS A DESIGNER: 
What Is In The Kit: https://youtu.be/qiVdqk2RDdw

JOIN MY CLUB COUTURE & GET EXCLUSIVE PERKS: 
EXCLUSIVE DISCOUNT: 25% OFF, Happy Mail, Exclusive Lives, Art Giveaways, and other benefits


Like these but not sure what Chalk Couture is- Click here to read all about it! 

Wanna shop for some Chalk Couture stuff? Click here to check out all the amazing items! 


And as always, help a sister out by sharing this post, like it and leave me a comment! 

Until then...


Sunday, June 27, 2021

Life is Better at the Beach Tablet Stand // Easy DIY Home Decor // Come chalk with me!

Want an easy to DIY that's easy to make and easy to change? Well you have found it! The Tablet Stand has been a game changer to add to my Decorated 3 Tiered tray. It's easy to chalk on, cleans off easy so you are ready to change it for the next holiday. 

I've had my eye on a transfer and when I decided to redo my 3 Tiered Tray with my Beach stuff, I knew the Life is Better at the Beach Transfer was perfect! I use this in the kitchen while cooking. I just place my tablet in it to keep my recipes available but out of the way. 

Want to see how I made it? Follow along!

Supplies Needed: 
Tablet Stand from Hobby Hobby
Life is Better at the Beach Transfer (retired)

Step 1
Get all your supplies together. Open the Couture Teal Chalk Paste  and Tide Chalk Paste and stir it well using a Stir Stick.

Step 2
Fuzz the transfer usin the Fuzzing Cloth. Don't be afraid to fuzz it alot. If it seems really sticky, it might need quite a few fuzzings. Since the new transfers seem to be stickier, fuzz fuzz FUZZ! You don't want that to pull up the back ground up when removing the transfer. 

Step 3
Press the transfer onto the surface firmly and grab the Stir Stick and apply the Couture Teal Chalk Paste onto the top of the transfer. Take the small squeegee and glide the Paste all over the transfer covering all mesh areas until you hit the last word -Beach. Only chalk with Couture Teal Chalk Paste on the top part of the word. Now take your Tide Chalk Paste and start from the bottom of the word Beach, but leave a small amount in the middle. There should be a line in between the 2 colors that has no paste. Then you are going to take your finger and combine the two colors. I like to use the motion of going up and down all the way across. you don't want to go side to side as it will not make the best ombre effect. Once fully chalked, pull the transfer from the top to bottom holding both ends, making sure to not stretch the transfer. Now since these new transfers seem to be more stickier that the older one, evenly pulling the transfer is important. 

Step 4
Clean your transfer right away. This will ensure more uses. To clean larger transfers, I clean them in the shower. Make sure the wall is clean and place the dirty transfer on there. Use the shower head to clean with cold water. Grab your board eraser and clean both sides. Once clean, hang or lay sticky side up until dry. Once dry, apply backer and store away. 

Now enjoy your creation! 
How cute is my Beachy 3 Tiered Tray? 

Watch me make it here: 
Do you make stuff for your home? Let me know! I would love to hear all about it! 

What Is Chalk Couture?: https://youtu.be/nyosBF7gSxo
See how to create with Chalk Couture: https://youtu.be/jHLd2P2zqWo

SAVE 40% OFF EVERYTHING & JOIN MY TEAM AS A DESIGNER: 
What Is In The Kit: https://youtu.be/qiVdqk2RDdw

JOIN MY CLUB COUTURE & GET EXCLUSIVE PERKS: 
EXCLUSIVE DISCOUNT: 25% OFF, Happy Mail, Exclusive Lives, Art Giveaways, and other benefits


Like these but not sure what Chalk Couture is- Click here to read all about it! 

Wanna shop for some Chalk Couture stuff? Click here to check out all the amazing items! 


And as always, help a sister out by sharing this post, like it and leave me a comment! 

Until then...


Saturday, June 26, 2021

DIY Easy Peasy Beach sign - make your own Home Decor in Minutes! // Come Chalk with Me!


I needed a smaller beachy sign for my 3 Tiered Tray, and I knew I could make one. But I didn't want to go buy anything, so I started searching around the house. I went outside to look through the scrap wood pile and found a perfect small. I sanded it just a tad, and then painted it white. 

After it was dry, I sanded the top and edges to give it a vintage vibe. Then I grab the Beach Vibes Transfer (retired), Shimmer Splash Chalk Paste, a Small Squeegee and a stir stick

Here's the Beach Vibes Transfer (Retired) That I used

Beach Vibes Chalk Transfer | Chalking With Jessica 

I only used the top portion of the transfer that says "beach". Once cut, I laid the transfer on the block in the middle and pressed to make sure it was adhered. 

I opened the Shimmer Splash Chalk Paste and gave it a good stir with a Stir Stick. I normally add a spray or two of distilled water to make sure its not too dry. I have noticed that most of the shimmer pastes stay well. They don't get many clumps at all.

Once the paste is stirred up well, I take out a small amount with the Stir Stick and put it in the transfer. 


Then I take my Small Squeegee and spread the paste all over the mesh areas. 

Once completed covered in paste. Lift up the transfer from the wood and wash immediately. This will keep your transfers sticky and you can use it many times! 


Look how easy that was! Just imagine what you could make for your home. 


Want to see how I made it? Watch here:

Watch this video and more on my Tik Tok Channel

 Do you make stuff for your home? Let me know! I would love to hear all about it! 

What Is Chalk Couture?: https://youtu.be/nyosBF7gSxo
See how to create with Chalk Couture: https://youtu.be/jHLd2P2zqWo

SAVE 40% OFF EVERYTHING & JOIN MY TEAM AS A DESIGNER: 
What Is In The Kit: https://youtu.be/qiVdqk2RDdw

JOIN MY CLUB COUTURE & GET EXCLUSIVE PERKS: 
EXCLUSIVE DISCOUNT: 25% OFF, Happy Mail, Exclusive Lives, Art Giveaways, and other benefits


Like these but not sure what Chalk Couture is- Click here to read all about it! 

Wanna shop for some Chalk Couture stuff? Click here to check out all the amazing items! 


And as always, help a sister out by sharing this post, like it and leave me a comment! 

Until then...


Friday, April 2, 2021

April Club Couture - What If You Fly? // Come Chalk with Me!

This month’s Club Couture™ Chalk Transfer design will give you wings to fly! The combination of cut-apart elements will give you the courage to dive forward with a planned design or just wing it.

Birds can be used as they are or repeated to create a whole flock. They look incredibly pleasant sitting on the included wire-element and are great for adding an accent color to match your space. Mix things up with any of your favorite Transfers by adding these classy and sassy bird silhouettes. Put a bird on it, making every day a happy bird-day.

Two different inspirational sentiments feature a mix of hand-lettering and a block-style font. Use them on a variety of surfaces throughout your home to create a whole set to display in a tiered tray, on a vignette, or to give as a gift set. Elements and sentiments can be mixed and matched to fill large or small surfaces.

This month’s Club Couture subscription includes Chalkology Paste Singles in Couture Teal, Peachy Keen, and Shimmer Silver. Recreate this look on a Couture Gallery™ Aiden Style White Frame (black, 9” x 12”, item S183127). The look as shown will use only two of your three paste colors, meaning you can save the third for a whole other project!

These are just a few of our ideas. We can’t wait to see what you’ll create; we’re certain your designs are going to be so fly.

Supplies Needed

Club Couture Transfer: What If You Fly
Surface: Couture Gallery Board Aiden White Frame
(Black, 9" × 12", item S183127)


Chalkology Paste Singles: Couture Teal, Peachy Keen,
Shimmer Silver
Optional: Chalkology Paste: Bright White

Tools: Mini Squeegee, Transfer Trimmers, Color Trays, Fuzzing Cloth

Color and Placement Suggestions

Bright White (optional) or Shimmer Silver: “What if I fall?” portion of the sentiment, and “–Erin Hanson” credit

Shimmer Silver: “What if you fly?” portion of the sentiment and wire line element

Couture Teal: Birds

Peachy Keen: Not specified for this project. Use however you’d like, or save it for another chalking experience!
Follow these instructions to complete this project:

1. Remove your Transfer from its packaging.

2. Cut along the Transfer’s provided cut lines to separate the elements. Use a marker to label each element’s Backer Sheet to make cleanup easier when matching it to its coordinating Transfer element.

3. Carefully peel off the Transfer Backer Sheet of the element you’re using first.

4. “Fuzz” the Transfer element by gently pressing onto a Fuzzing Cloth and carefully pulling it upward to collect a bit of lint (this helps to more easily remove the Transfer from the surface after you’ve applied the paste). You may repeat this a few times if your Transfer seems extra sticky.

5. Centering left to right, position the sentiment near the center top of the surface. Smooth out the element to adhere, ensuring there are no bubbles or wrinkles.

6. Centering left to right, position the wire/line element approximately 21⁄4" inches below the sentiment, leaving sufficient space for the birds to sit on the wire line. Smooth out the element to adhere, ensuring there are no bubbles or wrinkles.

7. Knead each Chalkology Paste Single, cut or tear open the top, and squeeze the desired amount onto a Color Tray, using a new tray for each color.

8. Use a generous amount of paste on your squeegee and smooth it over the Transfer elements (see “Color and Placement Suggestions”).

9. Once the screen portions of the design are completely covered, squeegee the excess paste off as evenly as possible and scrape it back into the tray. The more excess paste you remove, the better the result will be.
 
10. Before the paste dries, slowly peel back the Transfer. To prevent any stretching in the Transfer, peel from the center instead of peeling diagonally. Immediately clean the Transfer with cool water (do not let it soak).

11. Dry the Transfer flat with the sticky side up.

12. Repeat steps 8–10 for the wire line element.

13. Once the paste has dried, repeat steps 3–5 and 8–10 for the bird accents.

14. Once all Transfer elements are washed and dried, reapply the coordinating Backer Sheet to each and store flat.

15. Relish your creation!

Want to see a quick Video on how it is done? 

Watch this:

Not a Club Member yet?

Love your Club Couture membership, but want more to use them on? Get a Best Basics Chalk It Up Kit

Our basic instructions go like this: choose a surface and Transfer, add some paste or ink, and start creating. With the Best Basics Chalk It Up Kit, you’ll have what you need to carry out those instructions and you’ll be well on your way to artistry!

This kit includes two of our favorite surfaces: Board & Base (perfect for A-sized Transfers) and a Sylvie White Frame (perfect for B-sized Transfers). Both surfaces are reusable with Chalkology Paste, and can be used in either landscape or portrait orientation. Plus, that Board & Base is reversible so you can have two projects to display all at once!


What could you do if you believed in yourself
Somedays you may fall, but What if you Fly?    

 Do you make stuff for your home? Let me know! I would love to hear all about it! 

What Is Chalk Couture?: https://youtu.be/nyosBF7gSxo
See how to create with Chalk Couture: https://youtu.be/jHLd2P2zqWo

SAVE 40% OFF EVERYTHING & JOIN MY TEAM AS A DESIGNER: 
What Is In The Kit: https://youtu.be/qiVdqk2RDdw

JOIN MY CLUB COUTURE & GET EXCLUSIVE PERKS: 
EXCLUSIVE DISCOUNT: 25% OFF, Happy Mail, Exclusive Lives, Art Giveaways, and other benefits


Like these but not sure what Chalk Couture is- Click here to read all about it! 


Wanna shop for some Chalk Couture stuff? Click here to check out all the amazing items! 


And as always, help a sister out by sharing this post, like it and leave me a comment! 

Until then...


Google Analytics

AUTO ADS BODY