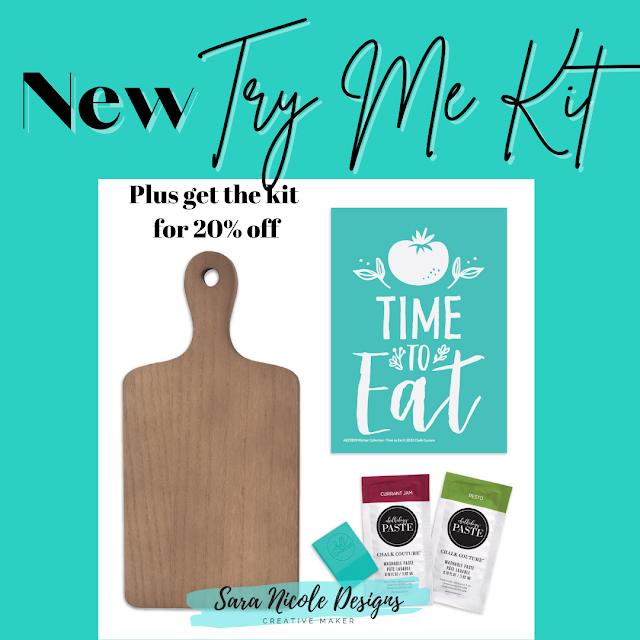
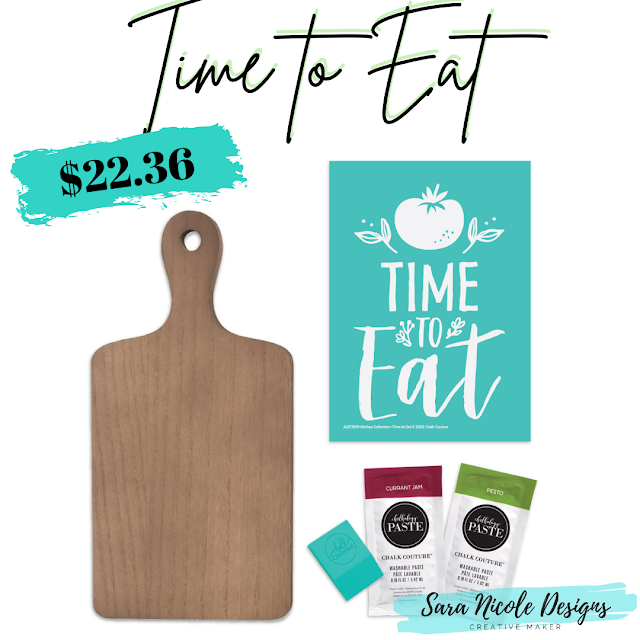
Try-Me Kits are an affordable, easy way for you to experience all the fun of Chalk Couture™—even if you have no chalking supplies on hand. You’ll get to make a complete project in minutes, at a so-nice price—20% off retail!
Give chalking a try with the perfect kit that includes everything you need! Gather up your favorite dishes and loved ones, ’cuz it’s time to eat! The Time to Eat Try-Me Kit features a scrumptious tomato and the words we all like to hear: “Time to eat”. Make a gorgeous statement in your kitchen by getting this project at 20% discount off retail price.
Kitchen Collection—Time to Eat Chalk Transfer® design
Decorative Cutting Board surface (5” x 7”)
Currant Jam Chalkology® Paste Single
Pesto Chalkology® Paste Single
Mini Squeegee
When you’re done with the designed project, you’ll have a fun décor piece, plus an A-sized Transfer and Mini Squeegee to use for future chalk projects!
Do you make stuff for your home? Let me know! I would love to hear all about it!
The December 2021 Club Couture™ Transfer is a great way to kick off your new year, sending vibes for good things to happen in 2022. For new chalkers and those who prefer a more simple project, this Chalk Transfer® design looks amazing chalked all in one color. For meticulous crafters and those who like to take things above and beyond, it’s a great chance to show off detail work, adding different hues to the design.
We’re showing off a bit here with a busier design; make it pop with a surface sized to allow a bit of empty space in the border around it. We’ve chosen to add our old staple Bright White (item P181121). The subscription includes Chalkology® Paste Singles in Couture Teal, Eucalyptus, and Peachy Keen, which can be used here or saved for future projects.
No matter how you chalk it, good things are going to happen!
Supplies Included
Club Couture Transfer: Good Things—December Club Couture Chalkology® Paste Singles: Couture Teal, Eucalyptus, Peachy Keen
Additional Supplies Needed
Surface: Sylvie White Frame (9" × 12") Chalkology® Paste: Bright White
Tools: Color Trays, Fuzzing Cloth, Detail Tool, Multi-Tool, Mini Squeegee
Follow these instructions to complete this project:
1. Remove your Transfer from its packaging and carefully peel off the Transfer Backer Sheet.
2. “Fuzz” the Transfer by gently pressing onto a Fuzzing Cloth and carefully pulling it upward. This will make the Transfer easier to remove from the surface after you’ve applied the paste.
3. Center the Good Things Transfer on the surface and smooth it out to ensure it has properly adhered and that there are no bubbles or wrinkles.
4. Knead your Chalkology Paste Singles. Cut open the corner of each packet and squeeze the desired amount of paste onto a Color Tray, using a new tray for each color.
5. With the curved edge of your Multi-Tool, thoroughly mix your jar of Bright White Chalkology Paste and scrape excess paste from the jar sides.
6. Use your Mini Squeegee, Multi-Tool, and Detail Tool to apply color over your Transfer (see “Color and Placement Suggestions”). Select your tool based on whichever size best fits the various Transfer elements. Once the screen portions of the design are completely covered, use your tools to remove excess paste as evenly as possible; excess paste can be scraped back into the tray or jar. The more excess paste you remove, the better the result will be.
7. For best results, divide your project into sections and use the chalk-and-pull method. This allows you to work in smaller sections without having the paste dry in the screen, which would give you patchy results. Chalk the top section of the design and peel back only that portion of the Transfer to let the paste dry on the surface before continuing (use the Quick Dry Tool for a fast dry). To prevent any stretching in the Transfer, peel from the center or from both corners, instead of peeling diagonally.
8. Gently lay the Transfer back down over the chalked section. Ensure that the next section is fully adhered, and repeat these steps as you work your way down the Transfer.
9. Once your design is fully chalked and before the paste dries, remove your Transfer from the surface and immediately clean the Transfer with cool water (do not let it soak).
10. Dry the Transfer flat with the sticky side up. Once completely dry, reapply the Transfer Backer Sheet and store flat.
11. Show off your latest DIY project to friends and family. And remember, good things are going to happen!
Our basic instructions go like this: choose a surface and Transfer, add some paste or ink, and start creating. With the Best Basics Chalk It Up Kit, you’ll have what you need to carry out those instructions and you’ll be well on your way to artistry!
This kit includes two of our favorite surfaces: Board & Base (perfect for A-sized Transfers) and a Sylvie White Frame (perfect for B-sized Transfers). Both surfaces are reusable with Chalkology Paste, and can be used in either landscape or portrait orientation. Plus, that Board & Base is reversible so you can have two projects to display all at once!
Are you ready for a new year? I know I am! Let's hope for the best year yet!
Do you make stuff for your home? Let me know! I would love to hear all about it!
There’s no place like home for the holidays! Start the countdown to Christmas with this classic project, and pull it out every single year for a memory-building piece your whole family will love.
The wreath is magnetic, with a tiny magnet to use on the back of the box frame, so you can move it around the calendar each day Christmas draws closer. This kit includes everything you’ll need to create your version of this advent calendar.
Includes the following: 1 House Box Frame (10” x 13”); 1 Magnetic Wreath; 1 Magnet; 1 ChalkMade—Christmas Advent B-sized Transfer; Chalkology® Paste Singles in Black Velvet, Candy Apple, and Pesto (.19 US fl. oz. each); 1 Mini Squeegee; 3 Color Trays (3”); and printed instructions
Do you use an Advent Calendar for your Christmas countdown?
Do you make stuff for your home? Let me know! I would love to hear all about it!
If you buy it painted by me, it comes with a Matte Black Round Base with a Chevron print scored into it. Then there is a Orange Pumpkin placed in the middle of the base, giving it a 3D feel.
If you buy the DIY Kit, you get each piece unfinished. That way you can paint it whatever colors you want to match your home decor. The Round Base is blank on the back. The pumpkin has an adhesive with a peel off backing so its easy to adhere onto the base. That means you don't have to worry about glue! I've got you covered! There is also 2 sponges include to paint each piece. Using a sponge to apply paint is an easy way and it leaves it without brush strokes. Paint is not included but can be purchased cheap at Target, Walmart, Amazon, Hobby Lobby, Joanns, Michaels or any craft store. You can even you paint from around the house!
These pieces are shelf leaners, which means they are meant to lean against something. It could lean on a 3 tiered tray or on a mantle. The possibilities are endless.
The Painted Finished item is painted matte black with a chevron patterned. Then finished off a orange pumpkin on top. This item is 4.227" wide by 4.259" length. It has a 1/4" total height.
The DIY Kit, you get each piece unfinished. That way you can paint it whatever colors you want to match your home decor. The Round Base is blank on the back. The pumpkin has an adhesive with a peel off backing so its easy to adhere onto the base. That means you don't have to worry about glue! I've got you covered! There is also 2 sponges include to paint each piece. Using a sponge to apply paint is an easy way and it leaves it without brush strokes. Paint is not included but can be purchased cheap at Target, Walmart, Amazon, Hobby Lobby, Joanns, Michaels or any craft store.
Now the only question: Which one is your favorite?
Do you make stuff for your home? Let me know! I would love to hear all about it!
Who doesn't love a good Halloween project?!? I know I do! So this is such a great project to do thats pretty easy!
I think this ChalkMade™ kit is simply bootiful. Give us candy. Give us cake. Give us something sweet to make! Treat yourself with a little handmade happiness this Halloween with this spooktacular felt banner and its coordinating accessories.
Chalkology® Paste singles in Bright White and Orange Peel
2 Color Trays
Mini Squeegee
Wooden dowel
Tassel accent
Printed instructions
Color and Placement Suggestions
Bright White: “Or”, Bats
Orange Peel: “Trick”, “Treat”
Follow these instructions to complete this project:
1. Remove your Transfer from its packaging.
2. Carefully peel off the Transfer Backer Sheet.
3. Center the Transfer on the Stitched Decorative Banner. Smooth the Transfer out to ensure it has properly adhered and that there are no air bubbles or wrinkles.
4. Knead your Chalkology Paste Singles. Cut open the corner of each packet and squeeze the desired amount of paste onto a Color Tray, using a new tray for each color.
5. Smooth a generous amount of Chalkology Paste over the Transfer using the Mini Squeegee (see “Color and Placement Suggestions”), pressing the paste completely through the screen.
6. Once the screen portion of the design is completely covered, squeegee the excess paste off as evenly as possible and scrape it back into the tray. The more excess paste you remove, the better the result will be.
7. Before the paste dries, slowly peel back the Transfer. To prevent any stretching, peel the Transfer back vertically from two parallel corners, instead of diagonally.
8. Immediately clean the Transfer with cool water and a Board Eraser. Do not leave the Transfer in water or let it soak.
9. Dry the Transfer flat with the sticky side up.
10. Insert the wooden dowel at the top of the Stitched Decorative Banner.
11. Attach the tassel accent to the wooden dowel as desired.
12. Thread the ribbon through the holes of the wooden dowel and tie a knot at each end.
13. Once the Transfer has been washed and dried, reapply the Backer Sheet and store it flat.
14. Relish your creation and embrace the beauty of homemade holiday projects!
What a whimsical, fun, summery project! Light and bright, this will be adorable when paired with your other summer décor. It’s little, it’s bright, and it’s the perfect way to acknowledge the glorious color of sunshine!
I love a good sunny day while watching my kids run around while drinking some ice coffee! That warm sunshine feels so good on my skin, the kids laughter while playing in the backyard...these are the days.
So maybe each year when I pull out the Summer decorations, It will remind me of those wonderful memories.
Get all your supplies together. Open the Bumblebee Chalk Paste and stir it well using a Stir Stick.
Step 2
Fuzz the transfer using the Fuzzing Cloth. Don't be afraid to fuzz it alot. If it seems really sticky, it might need quite a few fuzzings. Since the new transfers seem to be stickier, fuzz fuzz FUZZ! You don't want that to pull up the back ground up when removing the transfer.
Step 3
Press the transfer onto the surface firmly and grab the Stir Stick and apply the Bumblebee Chalk Paste onto the transfer. Take the small squeegee and glide the Paste all over the transfer covering all mesh areas. Since I am only using 1 color, I am able to chalk without it drying out. Once fully chalked, pull the transfer from the top to bottom holding both ends, making sure to not stretch the transfer. Now since these new transfers seem to be more stickier that the older one, evenly pulling the transfer is important.
Step 4
Clean your transfer right away. This will ensure more uses. To clean larger transfers, I clean them in the shower. Make sure the wall is clean and place the dirty transfer on there. Use the shower head to clean with cold water. Grab your board eraser and clean both sides. Once clean, hang or lay sticky side up until dry. Once dry, apply backer and store away.
Now enjoy your creation!
Watch me make it here:
Do you make stuff for your home? Let me know! I would love to hear all about it!