Showing posts with label decor. Show all posts

Sunday, October 16, 2022

My 2022 Halloween Tiered Tray // Hocus Pocus 2 inspired // Let's get to crafting!


Halloween is one of my favorite holidays and Hocus Pocus is one of my all time favorite Halloween movies. So when I heard that Hocus Pocus 2 was coming out just before Halloween this year, I knew that I wanted to theme this years Halloween 3 tiered tray after Hocus Pocus 2.

Want to check out last years Halloween 3 Tiered Tray? See it HERE!


Top Tier

From the left, we start with the Winifred Sanderson Funko Pop, then Sarah Sanderson Funko Pop, and then Mary Sanderson Funko Pop - all bought on Amazon last year. In front of the Sanderson Sister Funkopop are a small wooden caldron from the Target Dollar Section. In the back is a Hocus Pocus Rae Dunn Mug. The hand painted Halloween beaded garland that I made last year starts off the top tray. 

2nd Tier
From the left a Wicked Witch Rae Dunn Mug. Inside the Mug is a orange Trick or Treat Rae Dunn Spatula. Hanging on the Spatula is a Boo Tag that I made that year. Click HERE to read all about it. Also inside of that mug is a purple witch Hat from the Dollar Tree. Next to that mug is a metal black spider that I bought many years ago at the Disney Museum in San Francisco. Kellan was a baby when we visited the Disney Museum so about 11 years ago. I front of the spider is a 
vintage candy corn that I bought years ago at the Lodi Street Faire. It's one of my favorite decorations for Halloween. Next is a Candy Corn Brush tree from Target. Next to the tree is 3 glass potion bottles from the Target Dollar Section. They are Ghost's Breath, Zombie Skin and Dragon Scales. Behind those is a purple Witches Brew glass bottle that I got at the Dollar Tree a few years ago. Next to that on the right is another Candy Corn Brush tree from Target. he hand painted Halloween beaded garland continues onto the middle tray and drops down to the bottom tray. 
Bottom Tier
Starting from the left side is the Witch's Brew Rae Dunn Mug. Inside that mug is a green witch hat from Dollar Tree. Next to the mug is a large and small 
vintage candy corns that I bought years ago at the Lodi Street Faire. Next to the candy corns is a Johanna Parker Pumpkin Cupcake Man Shelf Sitter that I found at Marshalls. Next to him is another metal black spider from the Disney Museum. Behind the spider is a Purple Potion Rae Dunn Mug. Inside the mug is a black Spooky Rae Dunn Spatula that I got from Marshalls. Also inside the mug is an orange witch hat. The hand painted Halloween beaded garland continues on the bottom and hangs off the right side with a pumpkin at the end to finish it off. 

On the left hand side of the 3 tiered tray is my Pumpkin Cook Book Stand that I made. Read all about it HERE

Want to check out last years Halloween 3 Tiered Tray? See it HERE!

Want to see my 2020 Halloween 3 Tiered Tray Check it out HERE!

What is your favorite piece on the 3 tiered tray? I really love them all this year! 

Are you ready for Halloween? I know I'm ready for my little trick or treaters to dress up! 

 Do you make stuff for your home? Let me know! I would love to hear all about it! 


LET'S BE FRIENDS ON SOCIAL MEDIA:  
Find me on Instagram: https://bit.ly/2QTKYg4
Find me on Pinterest: https://bit.ly/3iaX94p
Find me on Facebook: https://bit.ly/3hYyoZ0
Join my VIP Group: https://bit.ly/2QPLgEV

What Is Chalk Couture?: https://youtu.be/nyosBF7gSxo
See how to create with Chalk Couture: https://youtu.be/jHLd2P2zqWo

SAVE 40% OFF EVERYTHING & JOIN MY TEAM AS A DESIGNER: 
What Is In The Kit: https://youtu.be/qiVdqk2RDdw

JOIN MY CLUB COUTURE & GET EXCLUSIVE PERKS: 
EXCLUSIVE DISCOUNT: 25% OFF, Happy Mail, Exclusive Lives, Art Giveaways, and other benefits


Like these but not sure what Chalk Couture is- Click here to read all about it! 

Wanna shop for some Chalk Couture stuff? Click here to check out all the amazing items! 

And as always, help a sister out by sharing this post, like it and leave me a comment! 

Until then...

Wednesday, March 2, 2022

Chalk Paste- What is it and why is it the best items for crafting! // Come craft with me!


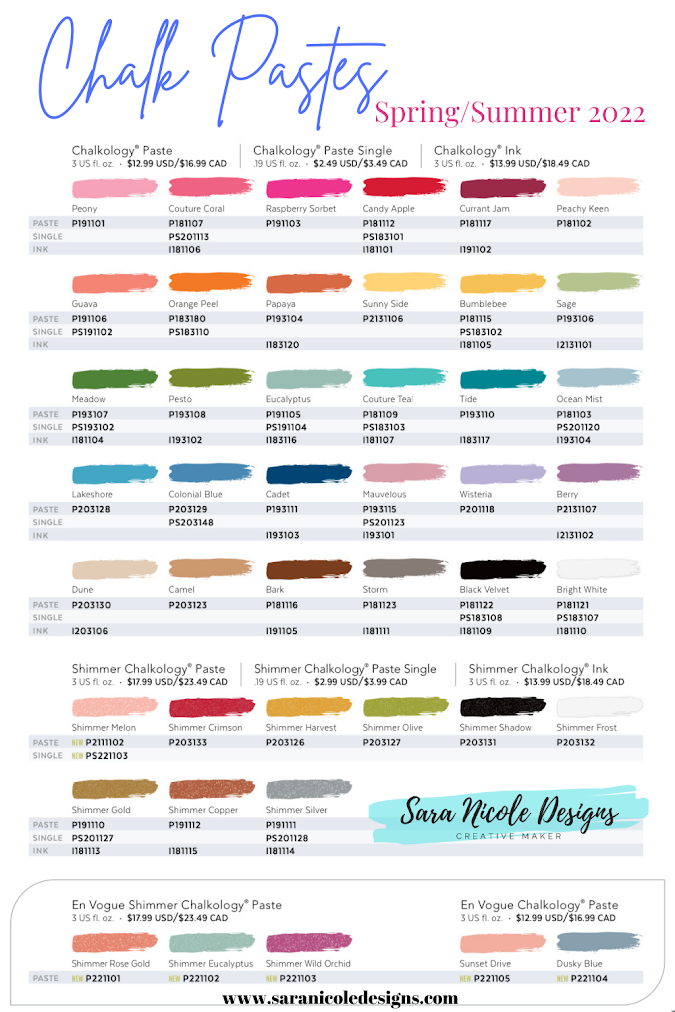
Did you know that Chalk Couture has a current stock of 44 Paste colors? Thats a ton! You can create so much with a palette of colors that big! You can even mix them to make an even more customer shade of paste. 

So what is Chalk Paste?
Chalkology Paste is specially formulated for use with Chalk Transfers and Chalk Couture surfaces. 

What can I put Chalk Paste on? 
Chalkology Paste can also be applied to other nonporous surfaces such as mirrors, windows, glass, painted walls, and painted furniture. Hard, matte finish when dry.

How can I remove Chalk Pastes? 
While you can chalk anything, Chalk Paste doesn't come off porous surfaces as easy. But while using nonporous surfaces such as mirrors, windows, glass, painted walls, and painted furniture with some distilled water and a board eraser. There is always a Paste Scraper that helps take it off easily.  

How long does a 3 oz. jar of paste last? 
A long time! When pasting a normal size project, you are not using too much paste. And once you are done pasting, you put the extra back into that jar. It's amazing how little paste you need to complete a project. 

Are there any other sizes? 
Yes! A lot of the paste colors come in Singles! They are in a .19 oz packet and most times can be used  for more than 1 project. Plus you can buy them in a Palette Pack of 6 that come in colors that coordinate.  

Can you mix chalk paste together?
YES! This give you just about an unlimited palette of colors that you can make. Want to match your homes colors scheme- you can do it! That's what makes chalk paste so special- you can customize you projects to what works for you! 

What maintenance does chalk paste need? 
Paste is easy to keep up. When ever you open a jar to use, stir it well. If it feels a little dry, spray some distilled water into it. Spray a little at a time, then stir. Repeat until you get the consistency you want. Before closing jar, give it one more stir. Make you you only use distilled water.  

What are your favorite Chalk Paste Colors? 

 Do you make stuff for your home? Let me know! I would love to hear all about it! 

What Is Chalk Couture?: https://youtu.be/nyosBF7gSxo
See how to create with Chalk Couture: https://youtu.be/jHLd2P2zqWo

SAVE 40% OFF EVERYTHING & JOIN MY TEAM AS A DESIGNER: 
What Is In The Kit: https://youtu.be/qiVdqk2RDdw

JOIN MY CLUB COUTURE & GET EXCLUSIVE PERKS: 
EXCLUSIVE DISCOUNT: 25% OFF, Happy Mail, Exclusive Lives, Art Giveaways, and other benefits


Like these but not sure what Chalk Couture is- Click here to read all about it! 


Wanna shop for some Chalk Couture stuff? Click here to check out all the amazing items! 


And as always, help a sister out by sharing this post, like it and leave me a comment! 

Until then...


Monday, October 18, 2021

Oh my Gourd- I Love Fall Metal sign // Come craft with me!

This is such a great item to use inside or outside your house. This sign only took about 5 minutes to make including set up and clean up. I love these projects since they are so easy to do. Plus, you can just spray it with water and wipe it off if you wanted to reuse the sign for another project. 

Oh my “gourd”! A funny autumnal play on words brings your Transfer collection to a whole new level. We know that projects made with this Transfer are going to get your friends and family to smile, especially when you’re giving those projects as seasonal gift items! For a different look, try using just the “I love fall!” portion by itself or in conjunction with any of our other autumn-themed offerings.

                        Come see how I made this! 


Step 1: Gather all your items together so they are in reach. I used a Hobby Lobby metal galvanized tag sized: 7 7/8 inches x 5 15/16 inches. I used 3 Chalk Pastes in Bright White, Black Velvet and Shimmer Pumpkin. I used 2 small squeegees and 1 mini squeegee. I used the Oh My Gourd Transfer

Step 2: Open your chalk pastes and stir them up so they are ready to be used. Add in some distilled water if needed but then new Chalk Pastes are amazing!


Step 3: Grab your transfer and a Fuzzing Cloth and fuzz well. I mean REALLY FUZZ! Use the back courser side of needed. 

Step 4: Lay your fuzzed transfer down and start applying you Chalk Paste to the transfer. I used 3 different Chalk Pastes colors. I started from the top with the Black Velvet Chalk paste, and then chalked the Gourd in Orange Peel Chalk Paste. If you are a slow chalked, I would use the Paste and Pull method. The Paste and Pull method is where you chalk and then lift the transfer up and pull down to the area you have chalked to. Hold it up until the paste looks dry. Then carefully lay it back down and continue chalking! The last part is to use the Bright White Chalk Paste in the words on the bottom. 

Step 5: Once you are done applying Chalk Paste, lift transfer up and wash it well. Let air dry and once dry, replace backer sheet

You are all done! Now it's time to show off your new DIY Oh My Gourd you made!


Watch me make it here: 

Are you excited for Fall? I know I am! 

Do you make stuff for your home? Let me know! I would love to hear all about it! 

What Is Chalk Couture?: https://youtu.be/nyosBF7gSxo
See how to create with Chalk Couture: https://youtu.be/jHLd2P2zqWo

SAVE 40% OFF EVERYTHING & JOIN MY TEAM AS A DESIGNER: 
What Is In The Kit: https://youtu.be/qiVdqk2RDdw

JOIN MY CLUB COUTURE & GET EXCLUSIVE PERKS: 
EXCLUSIVE DISCOUNT: 25% OFF, Happy Mail, Exclusive Lives, Art Giveaways, and other benefits


Like these but not sure what Chalk Couture is- Click here to read all about it! 

Wanna shop for some Chalk Couture stuff? Click here to check out all the amazing items! 


And as always, help a sister out by sharing this post, like it and leave me a comment! 

Until then...

Tuesday, May 11, 2021

My take on May's Club Couture - Sweet Lemon Grove // Come chalk with me!

I absolutely loved this months Club Couture transfer! It's just perfect for spring and summer time! With a few different added in options, you could make this transfer in so many ways! 

You could place it in the kitchen and make a Lemon Drop! Sounds yummy! 


Ready to see how I made it? 

Step 1: Grab all your supplies that you will need. This makes it so much easier so you don't have to get up while chalking. I didn't use the trays since I have the jars of each chalk paste. Always stir your paste colors before you use them. If they feel a little dry, add a little bit of distilled water to it and stir well. 

Step 2: I used the main part of the transfer so I cut off the extra 2 pieces off. 

Step 3: Time to Fuzz Fuzz FUZZ! These newer transfers seem really sticky so fuzz it well so it doesn't stick too much to the surface. 


Step 4: Lay your transfer down onto your surface. Make sure its completely flat. 

Step 5: Make a game plan of where you want your paste colors to go. I went by the instructions and used the Storm Paste for the letters, the Lemon in Bumblebee Paste and the leaves and accent pieces in Meadow PasteI used the Small Squeegees for each paste color. Have your pastes close to you for easy use. 

Step 6: I started from the top and worked my way down. Once I chalked everything from the GROVE up, I used the paste and pull method. Thats when you lift up the portion of the transfer, so the paste doesn't dry out and mess up when you wait till the end to lift up the transfer. I laid the transfer back down carefully. I also pasted a little thick to give myself a little extra time. Then removed the extra paste right before I used the paste and pull method. 

Step 7: Lift up transfer and wash it off. The faster you wash it, the cleaner it will be. Use the Board Eraser to get it really clean, really easy. Its a great tool! After washing, lay it upside down so it can dry and you can put on the backing. These transfers are meant to be used 8-12 times each! But I have heard of people using them way more than that! Now clean your tools. During the chalking, I will wipe them will baby wipes, but when I am done, I just put them in a mason jar filled will water. These are easy to clean too. I've never even needed soap to clean them. 

Step 8: Display your awesome chalk art!

Here's a video on how I made it:

What Paste colors could you choose? There are so many options, the outcome possibilities are unlimited! 

What do you want to make your lemons into? 
A Lemon Drop sounds perfect to me!     

 Do you make stuff for your home? Let me know! I would love to hear all about it! 

What Is Chalk Couture?: https://youtu.be/nyosBF7gSxo
See how to create with Chalk Couture: https://youtu.be/jHLd2P2zqWo

SAVE 40% OFF EVERYTHING & JOIN MY TEAM AS A DESIGNER: 
What Is In The Kit: https://youtu.be/qiVdqk2RDdw

JOIN MY CLUB COUTURE & GET EXCLUSIVE PERKS: 
EXCLUSIVE DISCOUNT: 25% OFF, Happy Mail, Exclusive Lives, Art Giveaways, and other benefits


Like these but not sure what Chalk Couture is- Click here to read all about it! 


Wanna shop for some Chalk Couture stuff? Click here to check out all the amazing items! 


And as always, help a sister out by sharing this post, like it and leave me a comment! 

Until then...


Google Analytics

AUTO ADS BODY