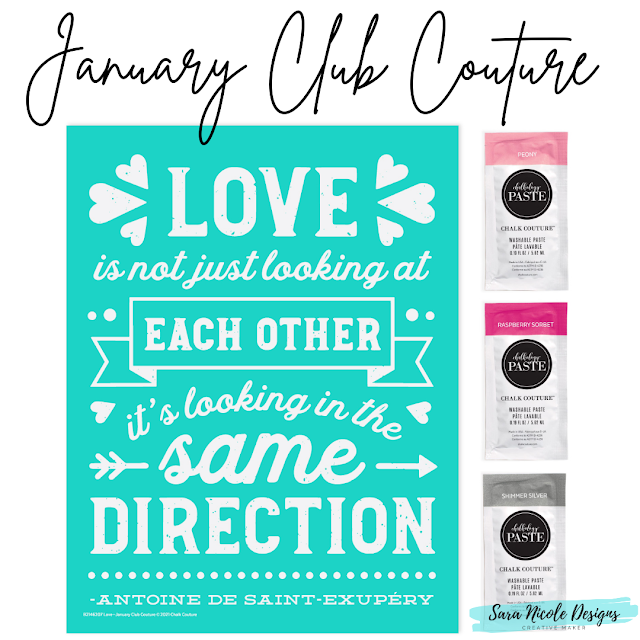
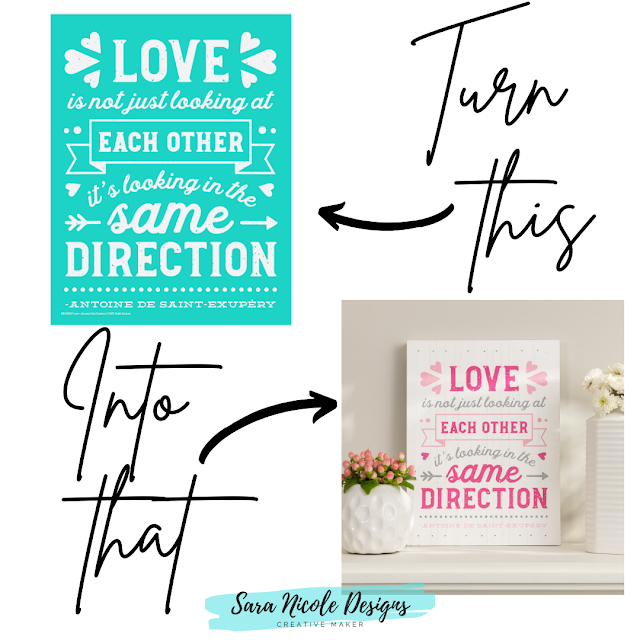
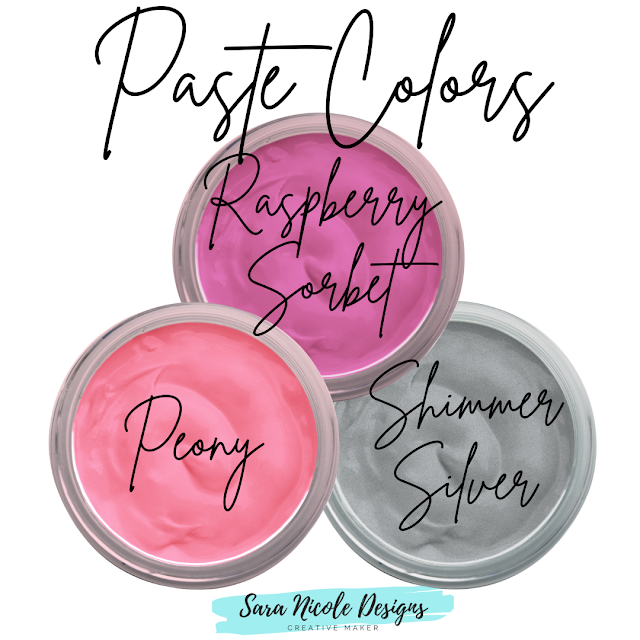
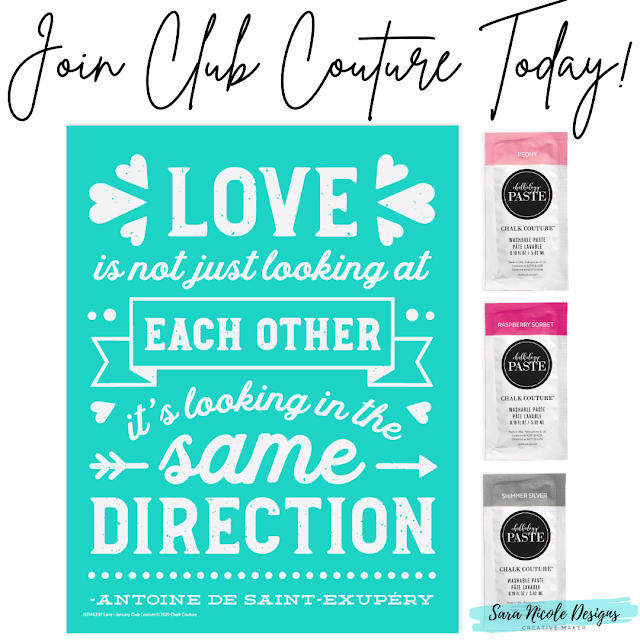
Set your sights on love and align your goals with your loved ones. Our lovey-dovey Love Chalk Transfer® design is the perfect addition to your Valentine’s Day home décor. Your shipment this month also includes the following Chalkology® Paste Singles: Peony, Raspberry Sorbet, and Shimmer Silver.
Enjoy the reminder to gaze adoringly into your loved one’s eyes and celebrate your common goals with this month’s Club Couture™ Transfer.
Ready to start this months creation? Follow along!
Supplies Included
-Club Couture Transfer design: Love—January Club -Couture Chalkology® Paste Singles: Peony, Raspberry Sorbet, Shimmer Silver
Additional Supplies Needed
Surface: Pallet Sign (9" × 12")
Tools: Color Trays, Fuzzing Cloth, Mini Squeegee
Color and Placement Suggestions
Peony: “Antoine de Saint-Exupéry”, triple heart details, double circle details, banner element
Shimmer Silver: “is not just looking at”, “it’s looking in the”, arrow element, dots
Follow these instructions to complete this project:
1. Remove your Transfer from its packaging and carefully peel off the Transfer Backer Sheet.
2. “Fuzz” the Transfer by gently pressing onto a Fuzzing Cloth and carefully pulling it upward. This will make the Transfer easier to remove from the surface after you’ve applied the paste.
3. Center the Love Transfer on the surface, and smooth it out to ensure it has properly adhered and that there are no bubbles or wrinkles.
4. Knead your Chalkology Paste Singles. Cut open the corner of each packet and squeeze the desired amount of paste onto a Color Tray, using a new tray for each color.
5. Starting from the top, use your Mini Squeegee to apply color over your Transfer (see “Color and Placement Suggestions”). Once the screen portions of the design are completely covered, use your tool to remove excess paste as evenly as possible; excess paste can be scraped back into the tray. The more excess paste you remove, the better the result will be.
6. For best results, divide your project into sections and use the chalk-and-pull method. This allows you to work in smaller sections without having the paste dry in the screen, which would give you patchy results. Chalk the top section of the design and peel back only that portion of the Transfer to let the paste dry on the surface before continuing (use the Quick Dry Tool for a faster dry). To prevent any stretching in the Transfer, peel from the center or from both corners, instead of peeling diagonally.
7. Gently lay the Transfer back down over the chalked section. Ensure that the next section is fully adhered, and repeat these steps as you work your way down the Transfer.
8. Once your design is fully chalked and before the paste dries, remove your Transfer from the surface and immediately clean the Transfer with cool water (do not let it soak).
9. Dry the Transfer flat with the sticky side up. Once completely dry, reapply the Transfer Backer Sheet and store flat.
10. Dry the Transfer flat with the sticky side up. Once completely dry, reapply the Transfer Backer Sheet and store flat.
11. Get ready for Valentine's Day and show off your lovely creation!
Our basic instructions go like this: choose a surface and Transfer, add some paste or ink, and start creating. With the Best Basics Chalk It Up Kit, you’ll have what you need to carry out those instructions and you’ll be well on your way to artistry!
This kit includes two of our favorite surfaces: Board & Base (perfect for A-sized Transfers) and a Sylvie White Frame (perfect for B-sized Transfers). Both surfaces are reusable with Chalkology Paste, and can be used in either landscape or portrait orientation. Plus, that Board & Base is reversible so you can have two projects to display all at once!
What is your love language? I like to create things for the people I love!
Do you make stuff for your home? Let me know! I would love to hear all about it!
You have heard me talk about it and you have seen my projects- so what is Chalk Couture?
Chalk Couture is a craft product that is both can be temporary and permanent. There is 2 types of product that is used. There is chalk paste which is a normally a temporary if put on the proper surface. And then there is Ink which is permanent after being heat set. The best part is the transfers!!! There are so many transfers that fit for every occasion possible. With all theses items, your projects are endless.
As a busy working mom, I don't have time to spend hours on creating cute chalk boards and buying a ton of different seasonal decorations to be used one. As a crafter, I love to make my own holiday decorations and have made so many decorations with Chalk Couture items. You wanna make a pillow for Christmas and than use that same design on a chalk board- you can do that! You want to make tea towels for a group of people- you can do that!
Here is a breakdown of what Chalk Couture has to offer:
Transfers- these are reusable silk screen stencils in a variety of sizes from 5" x 7" all the way to 18" x 24" with designs and patterns for just about every occasion. These transfers can used 8-12 times so you really get your money's worth! Some transfers come with one designs, while other transfers can be cut apart. There is even transfers that cut into 12 small transfers that fit perfect on chalkable chips - 3" circles are a chips that are ideal mini project.
Chalk Paste- Which is known as Chalkology™ Paste - comes in 30 colors, 3 shimmer and 5 en vogue (limited) color and in 3 fl oz containers - which also can be combined to create an unlimited amount of colors! These are think pastes the become fully dry in about 5-10 minutes or faster with a heat gun. They are easy to use. They glide on easy to the transfer and what ever is not used can go back into the paste pot. You will be able to utilize every bit - even if they dry out a bit- add water and stir and they come back to life. No waste here!Can also be applied to other nonporous surfaces such as mirrors, windows, glass, painted walls, and painted furniture. Hard, matte finish when dry. Used chalk but want to make it permanent?!?- spray with a clear aerosol sealer. Or change it up each season ( as long as its not on a porous surface) and spray with water and wipe clean. Ready to use for your next decoration.
Ink - Which is known as Chalkology™ Ink - Come in 23 different colors which include shimmer colors and in 3 fl oz containers. Who doesn't love a little shimmer! Chalkology™ Ink is specially formulated for use with Chalk Transfers™ and Chalk Couture™ surfaces. Ink offers permanent color when heat set and is ideal for fabric, apparel, and glass. Want to make shirts for the kids- than this is your go to!
Accessories- Tools are what make the job easy and create an amazing piece or work. So making sure you have the right tools is the key. You need to use paste in a small area - there is a tool for that! You want to use one color for the whole project - there is a tool for that too! Need to wax a project before - yep! You guessed it! There is a toolfor that as well! And they are all so easy to clean up too!
Surfaces- Last but definitely not least- these are a big one! I have used Chalk Couture surfaces and I have you non Chalk Couture surfaces. It really just depend on your project. But Chalk Couture has amazing surfaces to use. Did you want a framed surface or a pillow case? Or maybe a banner will work best for your project. Whatever it is, Chalk Couture most likely has. And if not- Hobby Lobby does!
Whatever you reasons, do it with me! As a long time crafter, this has to be one of the easiest crafts around. The best part is that anyone can do it- you don't need to be crafty to do great at this.
Have questions or want to try it out with me? Let me know! I will be having chalk parties, make and takes and Ladies nights soon!
The December 2021 Club Couture™ Transfer is a great way to kick off your new year, sending vibes for good things to happen in 2022. For new chalkers and those who prefer a more simple project, this Chalk Transfer® design looks amazing chalked all in one color. For meticulous crafters and those who like to take things above and beyond, it’s a great chance to show off detail work, adding different hues to the design.
We’re showing off a bit here with a busier design; make it pop with a surface sized to allow a bit of empty space in the border around it. We’ve chosen to add our old staple Bright White (item P181121). The subscription includes Chalkology® Paste Singles in Couture Teal, Eucalyptus, and Peachy Keen, which can be used here or saved for future projects.
No matter how you chalk it, good things are going to happen!
Supplies Included
Club Couture Transfer: Good Things—December Club Couture Chalkology® Paste Singles: Couture Teal, Eucalyptus, Peachy Keen
Additional Supplies Needed
Surface: Sylvie White Frame (9" × 12") Chalkology® Paste: Bright White
Tools: Color Trays, Fuzzing Cloth, Detail Tool, Multi-Tool, Mini Squeegee
Follow these instructions to complete this project:
1. Remove your Transfer from its packaging and carefully peel off the Transfer Backer Sheet.
2. “Fuzz” the Transfer by gently pressing onto a Fuzzing Cloth and carefully pulling it upward. This will make the Transfer easier to remove from the surface after you’ve applied the paste.
3. Center the Good Things Transfer on the surface and smooth it out to ensure it has properly adhered and that there are no bubbles or wrinkles.
4. Knead your Chalkology Paste Singles. Cut open the corner of each packet and squeeze the desired amount of paste onto a Color Tray, using a new tray for each color.
5. With the curved edge of your Multi-Tool, thoroughly mix your jar of Bright White Chalkology Paste and scrape excess paste from the jar sides.
6. Use your Mini Squeegee, Multi-Tool, and Detail Tool to apply color over your Transfer (see “Color and Placement Suggestions”). Select your tool based on whichever size best fits the various Transfer elements. Once the screen portions of the design are completely covered, use your tools to remove excess paste as evenly as possible; excess paste can be scraped back into the tray or jar. The more excess paste you remove, the better the result will be.
7. For best results, divide your project into sections and use the chalk-and-pull method. This allows you to work in smaller sections without having the paste dry in the screen, which would give you patchy results. Chalk the top section of the design and peel back only that portion of the Transfer to let the paste dry on the surface before continuing (use the Quick Dry Tool for a fast dry). To prevent any stretching in the Transfer, peel from the center or from both corners, instead of peeling diagonally.
8. Gently lay the Transfer back down over the chalked section. Ensure that the next section is fully adhered, and repeat these steps as you work your way down the Transfer.
9. Once your design is fully chalked and before the paste dries, remove your Transfer from the surface and immediately clean the Transfer with cool water (do not let it soak).
10. Dry the Transfer flat with the sticky side up. Once completely dry, reapply the Transfer Backer Sheet and store flat.
11. Show off your latest DIY project to friends and family. And remember, good things are going to happen!
Our basic instructions go like this: choose a surface and Transfer, add some paste or ink, and start creating. With the Best Basics Chalk It Up Kit, you’ll have what you need to carry out those instructions and you’ll be well on your way to artistry!
This kit includes two of our favorite surfaces: Board & Base (perfect for A-sized Transfers) and a Sylvie White Frame (perfect for B-sized Transfers). Both surfaces are reusable with Chalkology Paste, and can be used in either landscape or portrait orientation. Plus, that Board & Base is reversible so you can have two projects to display all at once!
Are you ready for a new year? I know I am! Let's hope for the best year yet!
Do you make stuff for your home? Let me know! I would love to hear all about it!
There’s no place like home for the holidays! Start the countdown to Christmas with this classic project, and pull it out every single year for a memory-building piece your whole family will love.
The wreath is magnetic, with a tiny magnet to use on the back of the box frame, so you can move it around the calendar each day Christmas draws closer. This kit includes everything you’ll need to create your version of this advent calendar.
Includes the following: 1 House Box Frame (10” x 13”); 1 Magnetic Wreath; 1 Magnet; 1 ChalkMade—Christmas Advent B-sized Transfer; Chalkology® Paste Singles in Black Velvet, Candy Apple, and Pesto (.19 US fl. oz. each); 1 Mini Squeegee; 3 Color Trays (3”); and printed instructions
Do you use an Advent Calendar for your Christmas countdown?
Do you make stuff for your home? Let me know! I would love to hear all about it!
Do you listen for hoof sounds on your roof on Christmas Eve? We do! My kids love to listen and see if they can hear Santa an his Reindeers before they go to bed.
This transfer is so versatile and can be used in so many different ways. What ways can you use this transfer?
Supplies Included
-November Club Couture Transfer: Reindeer Parking
-Chalkology® Paste Singles: Black Velvet, Candy Apple, Shimmer Gold
Other Supplies Needed
-Surface: Door Tag (9" × 12") -Tools: Color Trays, Fuzzing Cloth, Mini Squeegee, Small Squeegee
Color and Placement Suggestions
Black Velvet: “up on the housetop”, “one night only” Candy Apple: “reindeer parking” Shimmer Gold: reindeer and sleigh
Follow these instructions to complete this project
1. Remove your Transfer from its packaging and carefully peel off the Transfer Backer Sheet.
2. “Fuzz” the Transfer by gently pressing onto a Fuzzing Cloth and carefully pulling it upward. This will make the Transfer easier to remove from the surface after you’ve applied the paste.
3. Center the Reindeer Parking Transfer on the surface and smooth it out to ensure it has properly adhered and that there are no bubbles or wrinkles.
4. Knead your Chalkology Paste Singles. Cut open the corner of each packet and squeeze the desired amount of paste onto a Color Tray, using a new tray for each color.
5. Use your Mini Squeegee or Small Squeegee to smooth a small amount of paste over the Transfer (see “Color and Placement Suggestions”).
6. As you work through each detail and color, use your Squeegee(s) to clear the excess paste off as evenly as possible and scrape it back into the tray. The more excess paste you remove, the better the result will be.
7. Before the paste dries, remove your Transfer from the surface and immediately clean the Transfer with cool water (do not let it soak).
8. Dry the Transfer flat with the sticky side up.
9. Reapply the Transfer Backer Sheet and store flat.
10. Admire your new creation and get ready for the sound of reindeer on your roof!
Our basic instructions go like this: choose a surface and Transfer, add some paste or ink, and start creating. With the Best Basics Chalk It Up Kit, you’ll have what you need to carry out those instructions and you’ll be well on your way to artistry!
This kit includes two of our favorite surfaces: Board & Base (perfect for A-sized Transfers) and a Sylvie White Frame (perfect for B-sized Transfers). Both surfaces are reusable with Chalkology Paste, and can be used in either landscape or portrait orientation. Plus, that Board & Base is reversible so you can have two projects to display all at once!
Do you decorate for Christmas early or do you wait until Thanksgiving is over?
Do you make stuff for your home? Let me know! I would love to hear all about it!