Showing posts with label 4th of July. Show all posts

Sunday, July 4, 2021

My 4th of July Mantle for 2021! Come craft with me!

I love decorating for the 4th of July! I love the colors and the feeling it give me - I love my Country and I love to celebrate it! I had a lot of fun creating new items with my Glowforge and Chalk Couture. Plus buying new items when I find them. 

How many items did I make for my mantle this year? 

Want to see my 4th of July Mantle from Last year? 

Click HERE! 


Starting on the left is the Freedom sign that I made from a found surface and Chalk Couture items. I loved this sign so  much that I packed it away to use it again. I used 2 retired Chalk Couture Transfers - Freedom and Homespun Stars. I used 3 Chalk Pastes in  Candy AppleBlue Jay (retired) and Bright White. I found this surface at Hobby Lobby on clearance. I painted it with black chalkboard paint. 


Next to Freedom sign is a Land of the Free sign that I made from a piece of scrap wood, scrapbook paper and Chalk Couture items. I sanded the scrap wood and added the scrapbook paper with Modge Podge. After that dried, I added one more coat on top. Once that dried, I took the Home of the Brave Transfer (retired) and used a portion of it. Then I used Black Velvet Chalk Paste

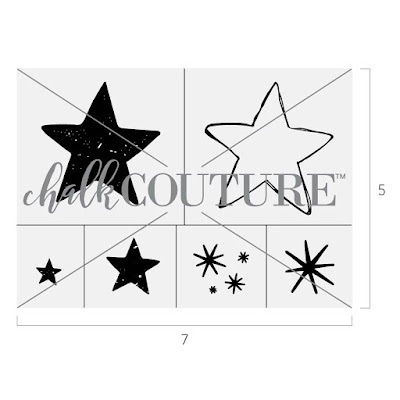
On top of that sign is a small sign I made from a wood scrap. I painted it with blue paint and sanded the edges to give it a vintage feel. Then I used the Star Cutout Pattern Transfer, and used just the Star & Stripes  Forever portion. I just used the Stars & Stripes section. Then I used Bright White Chalk Paste.

The next sign was another sign I made from a scrap of wood. I sanded it and painted it with white paint. After the paint was dry, I sanded the edges to give it a vintage feel. Then I used Herringbone Transfer (retired) with Shimmer Splash Chalk Paste. I let the dry and then I used a portion of the Home of the Brave Transfer. I used just the July portion of the saying Fourth of July. I used Candy Apple Chalk Paste


Next to the July sign is a Stars & Stripes Forever sign that I made from a clearance frame and Chalk Couture items. I painted the front of the frame with white chalkboard paint. I sanded the edges for a vintage feel. The 1st transfer I used was the Star with little starts inside from the Star Cutout Pattern Transfer and  then I used Cadet Chalk Paste. Once that dried, I used the Stars and Stripes Forever portion from the Star Cutout Pattern Transfer and used Candy Apple Chalk Paste.

On top of that sign is a sign I made from scrap wood, Polkadot Chalk Couture Transfer, a cutout from my Glowforge and paint.  I sanded my scrap wood and then painted it with white paint. Then I used the Polkadot Transfer(retired) with Candy Apple Chalk Paste. I then cut the USA on my Glowforge and then painted it with blue paint. Once it was dry, I glued it on! Easy Peasy! 


On the right side, I have my Rae Dunn Let Freedom Ring door hanger from Marshalls. 

Next to that is a large 2 piece America/Celebrate wooden tags set. The set is so large, I just stacked them together. I bought it at Marshalls. 

On top of the Tag Set is a 3 piece Wooden Flag set that I purchased from a local maker named Megan. She makes all kinds of signs and fun wooden items! I love to support other local small makers! 

Now on the left hand bottom side is a Home of the Free sign shipped like the United States. I bought this at Hobby Lobby. 

Next is a United We Stand box art that I bought on clearance from Hobby Lobby. 

Next to that is an wooden anchor that I also used during the year. 

On the top left of the wood burning stove is an America Sign that I made from Scrap wood, paint, Chalk Couture items and my Glowforge. First I sanded the scrap wood and then painted it. I sanded it after it was dry to give it a vintage look. I then used a Chalk Couture June Club Transfer from a previous year that I bought it a special sale. I then used Candy Apple Chalk Paste. I then cut out the work America on my Glowforge and painted it blue. Once dry, I glued it under the USA silhouette. 

On top of the America sign is a wooden firework set from the Dollar Spot at Target. 

The next is a Boom sign that I made from scrap wood, paint and my Glowforge. I sanded the wood, then painted it red. Once dry, I sanded it to give it a vintage look. I then cut out Boom with a firework under it. Then I painted it with white paint. Once dry, I glued it on.

On the right side there is a set of 3 Wooden Stars Cutouts from Chalk Couture. They come in size small, medium and large. I used the Star Cutout Pattern Transfer, which is made for these wooden stars. For the large Start I used Shimmer Splash Chalk Paste, the middle star I used Candy Apple Chalk Paste, and for the small star I used  Candy Apple Chalk Paste and Cadet Chalk Paste and I used the ombre technique. 


I made this USA sign last year from a surface from Hobby Lobby, ribbon and Chalk Couture items. I had some of the individual letter transfers (retired), so I was able to do USA. I used  Candy Apple Chalk Paste and then finished them off with a ribbon accent on one side. 

The Ribbon banner was used for Mason's 1st birthday. He is now 4 so I have gotten use out of it for sure! 

Want to know how many items I made for my mantle? 
13!

 Do you make stuff for your home? Let me know! I would love to hear all about it! 

What Is Chalk Couture?: https://youtu.be/nyosBF7gSxo
See how to create with Chalk Couture: https://youtu.be/jHLd2P2zqWo

SAVE 40% OFF EVERYTHING & JOIN MY TEAM AS A DESIGNER: 
What Is In The Kit: https://youtu.be/qiVdqk2RDdw

JOIN MY CLUB COUTURE & GET EXCLUSIVE PERKS: 
EXCLUSIVE DISCOUNT: 25% OFF, Happy Mail, Exclusive Lives, Art Giveaways, and other benefits


Like these but not sure what Chalk Couture is- Click here to read all about it! 


Wanna shop for some Chalk Couture stuff? Click here to check out all the amazing items! 


And as always, help a sister out by sharing this post, like it and leave me a comment! 

Until then...


Friday, July 2, 2021

4th of July 3 Tiered Tray // Come Chalk with Me! // 2021


I had so much fun buying and creating items for this years 4th of July. I just bought a Glowforge about a month ago, and I couldn't wait to use it! If you don't know what a Glowforge is, it's a Laser Printer that cuts, engraves and scores all kinds stuff like wood, fabric, leather, paper, Plexiglas (acrylic), Delrin (acetal), mylar, rubber, Corian, foods, and more. Glowforge can also engrave all of the above plus glass, coated metal, marble, anodized aluminum, titanium, some phones, tablets, and laptops, and more. So pretty much a fancy crafting machine! 

Want more info on the Glowforge? Click Here! 

Some of the items that I chalked and some items I created my own files and cut in the Glowforge. Plus some items I bought too. 

How many Rae Dunn items do you see?

Want to see my 2020 4th of July 3 Tiered Tray?            Click Here!

Come see how I styled my 4th of July 3 Tiered Tray! 


Top Tier

This tier starts with a red, white and blue wooden beaded garland with a wooden tag with says God Bless America. Next to that is a wooden Star with a flag print from Hobby Lobby (last year). Then is the Blue Matte Rae Dunn USA Mug from Marshalls. Inside the mug is a sign that I made from a scrap piece of wood and I created the design myself and cut it out on my Glowforge. Then I painted it and glued it on to the scrap piece of wood. Behind the sign and inside the mug are some glitter stars on sticks from Dollar Tree. There is a thin vintage garland that starts on the top tier and continues throughout all of the tiers. 


Middle Tier

Starting on the Left side, is a red & white striped small bowl that came from the dollar section at Target a few years ago. Inside that is a plastic ice cream bowl that came in a set (see bottom tier for the rest) of 4. Next is the small shabby chic USA sign that I made from a piece of scrap wood and Chalk Couture transfer and Chalk Paste. On top of that is a hanging decoration on a vintage 4th of July little girl from Hobby Lobby. On the right is a Rae Dunn Brave Mug. Inside of the mug are some more glitter stars on sticks from Dollar Tree. In front of the mug is a small wooden sign that says America from Hobby Lobby. The thin vintage garland continues on this tier too. 

Bottom Tier

From the left, I painted 2 old cans with chalk paint in white and blue and sanded them down a bit. Then there is a small blue with while stars bowl - that came in a set with the red & white striped bowl from the middle tier- from the dollar spot at Target. Inside that bowl is a Rae Dunn USA mug. Next to that is another red painted can. Inside of the can is a Freedom sign from Hobby Lobby. In the middle is a Rae Dunn flag candle with Brave writer under the flag(2020). On the right is a Rae Dunn America Mug. Inside of the Mug are 2 Rae Dunn Spatulas -Large has a Americana Top Hat and says Brave and the Small on says Home of the Brave. In the back is the 3 other ice cream bowls in fun red, white and blue patterns. These also have spoons inside. The thin vintage garland continues and finishes under this tier.


How many Rae Dunn items did you find?                           7! 

Do you make stuff for your home? Let me know! I would love to hear all about it! 

What Is Chalk Couture?: https://youtu.be/nyosBF7gSxo
See how to create with Chalk Couture: https://youtu.be/jHLd2P2zqWo

SAVE 40% OFF EVERYTHING & JOIN MY TEAM AS A DESIGNER: 
What Is In The Kit: https://youtu.be/qiVdqk2RDdw

JOIN MY CLUB COUTURE & GET EXCLUSIVE PERKS: 
EXCLUSIVE DISCOUNT: 25% OFF, Happy Mail, Exclusive Lives, Art Giveaways, and other benefits


Like these but not sure what Chalk Couture is- Click here to read all about it! 

Wanna shop for some Chalk Couture stuff? Click here to check out all the amazing items! 


And as always, help a sister out by sharing this post, like it and leave me a comment! 

Until then...

Saturday, July 4, 2020

My 4th of July Mantel - Oh how I love you so!


So by now, we all know that I LOVE the 4th of July.... and now with a bigger house, we can decorate more! I'm sure my husband just loves that ;) So I slowly decorated that Mantel thinking that he wouldn't notice. I don't think he minds since he is so patriotic and love the 4th of July as much as I do. 

On my large sign on the left, I found that surface at Hobby Lobby with an orange clearance sticker. I can't even remember what design was on it, but I knew a coat or two of black chalk paint would make it into a great chalking surface. Once done painting it, I picked 2 retired transfers called Freedom and Homespun Stars.  
Retired Freedom Transfer
Homespun Stars
Retired Homespun Stars Transfer
This transfer fit just perfect of this surface! I actually only used the bottom half of the freedom transfer- It's so large that you can cut it into 2 parts. You could really cut it up a lot smaller, but i love the layout that it already has. I cut the Freedom transfer in 2 and laid the bottom half on the lower section of the surface. I stirred all the chalk pastes before starting. I picked Candy Apple, Blue Jay and Bright White for my paste colors. I kind of picked the paste color as I went down the transfer. After each line, I would lift that section and let it dry. The reason is that if you let the chalk dry in the transfer and then try to lift it up, it will lift up the chalk too and mess it all up. After completing the Freedom portion of the transfer, I randomly added the Homespun Stars at the top. My favorite start in the 3 toned star on the left side. 

I really wish these transfer weren't retired! I would have gotten another set!

Do you decorate your Mantel for any holidays? I'd love to hear all about them! Leave me a comment! 


Like these but not sure what Chalk Couture is- Click here to read all about it! 

Wanna shop for some Chalk Couture stuff? Click here to check out all the amazing items! 


And as always, help a sister out by sharing this post, like it and leave me a comment! 

Until then...

Sara ;)

Thursday, July 2, 2020

4th of July Tiered tray- how I decorated it!


If you read my previous post, you know how much I love to decorate for 4th of July! I have a 3 tiered tray that I got from Hobby Lobby a while back and it sits on my counter in the Kitchen. I am currently looking for a hutch to put in the dining room, but I am stubborn and want it a certain style... like if vintage and farmhouse had a baby together. So until them, my 3 tiered tray will live on the counter. 

Anytime seeing any smaller 4th of July decorations, I snag them to add them to my 3 tiered tray. I am a Rae Dunn collector so I try to have holiday themed mugs be the centerpiece. I have only found one 4th of July Mug so far. I've been on the search anytime I go to Marshalls. 

Are you a Rae Dunn collector yourself? Or do you collect something completely different? I would love to know! Leave me a comment and tell me what you collect! 

Here is my 3 tiered trays decorated for the 4th of July. Let me know what you think! 


Remember- help a sister out by sharing this post, like it and leave me a comment! 

Until then...

Sara ;)

Tuesday, June 30, 2020

DIY 4th of July Kitchen Towels


One of my favorite holidays is 4th of July! I love to decorate the outside of my house and the inside of my house. I'm always on the look out for great 4th of July decorations, especially at Hobby Lobby, Target and Marshalls. My collection of decoration is growing and i'm ok with that. 

One day while strolling through the dollar section at target, i'm sure with a Starbucks, I saw this set of 2 Kitchen towels. For $3, I couldn't pass it up! They were perfect for the 4th, and I had an idea to use Chalk Couture Ink to add a little extra to them. 

I'll show you how I made them! 

Supplies needed: 
-Kitchen Towels - I got mine in the dollar section- 2 towels for $3!
-Chalk Couture Ink - I used Cadet and Candy Apple 
-Chalk Couture Small Squeegee
-631 Vinyl
-Cutting Machine- I use a Silhouette Machine 
-Transfer tape - I use clear shelf protector for the dollar store! 
-Parchment paper
-Heat Press or Iron

Step 1: Get your towels ready- remove all tags and press them if needed if they are wrinkly. 


Step 2: Choose your designs that you want to add and cut them with your cutting machine. I chose Let Freedom Ring by Dawn Nicole Designs and Retro July 4th by Sophie Gallo. When getting ready to cut your design, you make have to tweak it a bit. With the design - Let Freedom Ring- I had to remove the outer cutting line from the design. I learned this by cutting it and trying to weed it, and figuring it out the hard way. 

Step 3: Reverse weed the design. Once all the weeding is complete, adhere transfer tape on the top on the design. Press it down firmly with your scraper. 


Step 4: Place the design on the towel where you would like it. Press it down firmly with the scraper over and over and over. Start to lift the transfer tape up from the top and carefully pull down, watching out for the small pieces. You may need to take the end of the scraper and hold down the small pieces to keep them from lifting. After you have completely lifted the transfer tape up, I like to place a piece of parchment paper over it and run the scraper over it again just to make sure they all adhere to the towel. Place wash tape around the edge of the design to make sure you don't get ink on the towel. 


Step 5: Time to INK! Grab your ink and open it up. Stir it well. Always stir! Dip your squeegee into the color and run over your design carefully. There is not mesh with this design so you can't be rough with it. 


Step 6: Once you have completely inked your design, remove the washi tape first and then the vinyl from the top and pulling it down. Now take a sharp weeding tool and remove the small pieces that are left behind. 


Step 7: Let it dry or use a dryer to dry it out if you want to use them ASAP. I always let them dry over night. But I did just buy a heat gun so maybe that will change ;) 

Step 8: Once dry, now you heat set them. That way you can wash them and the design won't come off. I use a Cricut Heat Press but you can use an iron if you don't have one. I set my heat press to 300 degrees and set a 30 second time. 


And just in 8 easy steps, you have DIY custom kitchen towels!
 
I paired my kitchen towels with some tea towels that I tye dyed! I love how they came out! 

What would you put on your kitchen towels?  Let me know!  


Like this but not sure what Chalk Couture is?!?- Click here to read all about it! 

Wanna shop for some Chalk Couture stuff? Click here to check out all the amazing items! 

And as always, help a sister out by sharing this post, like it and leave me a comment! 

Until then...

Sara ;) 

Google Analytics

AUTO ADS BODY