Showing posts with label home decor. Show all posts

Saturday, June 26, 2021

My Beachy 3 Tiered Tray with all of my favorite beach items! // Plus create custom Home Decor // Come Chalk with Me!

If you know me, you know I love the ocean. So my home has a lot of ocean vibes and colors. I love to create my beachy ocean 3 tiered tray! With all of the holidays, I don't feel that it gets enough time up since 4th of July is so close. I may just have to put it back up after the 4th! 

Come see how I styled my Beachy 3 Tiered Tray! 


Want to check out last years Beach 3 Tiered Tray? 


Top Tier
One if my favorite Rae Dunn Mugs is my Vitamin Sea Mug! That's why it's on the top! I placed 2 star fish inside on the top. Next to the mug is a tea light candle holder in a muted ocean blue color. I bought a set of these a long time ago and love to use them whenever I can. Then I used the Ocean colored wood bead garland that I made last year. 


Middle Tier
This tier holds another one of my favorite Rae Dunn Mugs - Beach Please. I actually bought Beach Please and Vitamin Sea as a set from Poshmark for too much money, butI knew I would never find them in Lodi. Next to the mug is another blue candle holder that has a vintage mercury feel. Ive also had this handle holder for a long time and have used it so many times. Front and center is a painted and distressed wooden white whale that my mom bought me. We used it in my youngest sons nursery. The wooden bead garland continues throughout this tier as well.


Bottom Tier
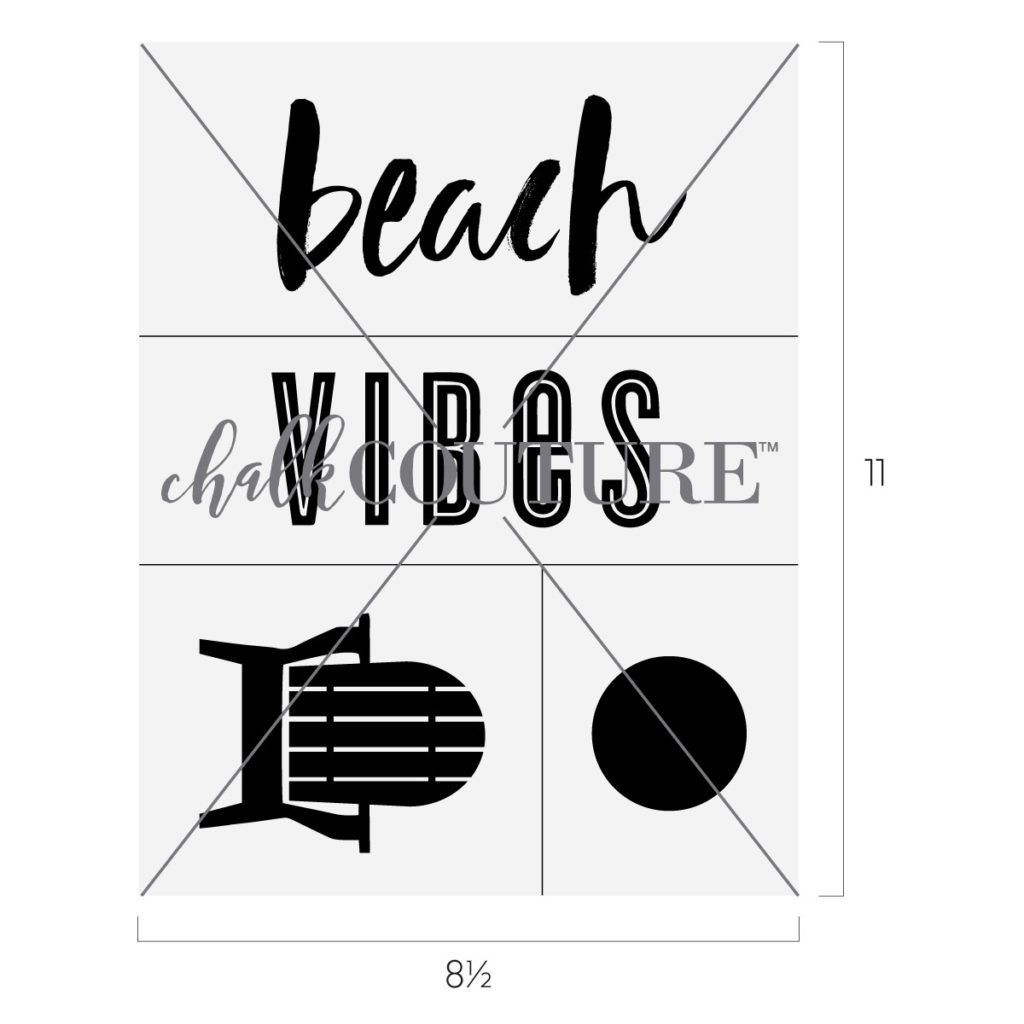
I found this adorable blue Rae Dunn short Paradise candle a few weeks ago in Marshalls. I love the color and felt that it would go perfect with my Beachy Decor. On the other side is another Rae Dunn Mug - Create your own Sunshine. Who doesn't need a little sunshine... make sure to create your own and share! From and center is a sign I made from scraps and Chalk Couture products. Come check out the blog post on how I made it HERE! In the back is the matching vintage looking candle holder from the middle tier. To finish it off, I brought the wooden beaded garland all the way across and hanging off the side. 


Left Side
I've had this small framed picture with a print from Katie Daisy inside for a long time. I love to use it around the house since it is so pretty.
 

Right Side
I have used this Tablet Stand so many times and love changing it up for each change up of the 3 Tiered Tray. This time I created the Tablet Stand with the Life is better at the Beach Transfer. I loved making this with the ombre technique. To see how I made this, Click Here to read all about it! 

Do you make stuff for your home? Let me know! I would love to hear all about it! 

What Is Chalk Couture?: https://youtu.be/nyosBF7gSxo
See how to create with Chalk Couture: https://youtu.be/jHLd2P2zqWo

SAVE 40% OFF EVERYTHING & JOIN MY TEAM AS A DESIGNER: 
What Is In The Kit: https://youtu.be/qiVdqk2RDdw

JOIN MY CLUB COUTURE & GET EXCLUSIVE PERKS: 
EXCLUSIVE DISCOUNT: 25% OFF, Happy Mail, Exclusive Lives, Art Giveaways, and other benefits


Like these but not sure what Chalk Couture is- Click here to read all about it! 

Wanna shop for some Chalk Couture stuff? Click here to check out all the amazing items! 


And as always, help a sister out by sharing this post, like it and leave me a comment! 

Until then...


DIY Easy Peasy Beach sign - make your own Home Decor in Minutes! // Come Chalk with Me!


I needed a smaller beachy sign for my 3 Tiered Tray, and I knew I could make one. But I didn't want to go buy anything, so I started searching around the house. I went outside to look through the scrap wood pile and found a perfect small. I sanded it just a tad, and then painted it white. 

After it was dry, I sanded the top and edges to give it a vintage vibe. Then I grab the Beach Vibes Transfer (retired), Shimmer Splash Chalk Paste, a Small Squeegee and a stir stick

Here's the Beach Vibes Transfer (Retired) That I used

Beach Vibes Chalk Transfer | Chalking With Jessica 

I only used the top portion of the transfer that says "beach". Once cut, I laid the transfer on the block in the middle and pressed to make sure it was adhered. 

I opened the Shimmer Splash Chalk Paste and gave it a good stir with a Stir Stick. I normally add a spray or two of distilled water to make sure its not too dry. I have noticed that most of the shimmer pastes stay well. They don't get many clumps at all.

Once the paste is stirred up well, I take out a small amount with the Stir Stick and put it in the transfer. 


Then I take my Small Squeegee and spread the paste all over the mesh areas. 

Once completed covered in paste. Lift up the transfer from the wood and wash immediately. This will keep your transfers sticky and you can use it many times! 


Look how easy that was! Just imagine what you could make for your home. 


Want to see how I made it? Watch here:

Watch this video and more on my Tik Tok Channel

 Do you make stuff for your home? Let me know! I would love to hear all about it! 

What Is Chalk Couture?: https://youtu.be/nyosBF7gSxo
See how to create with Chalk Couture: https://youtu.be/jHLd2P2zqWo

SAVE 40% OFF EVERYTHING & JOIN MY TEAM AS A DESIGNER: 
What Is In The Kit: https://youtu.be/qiVdqk2RDdw

JOIN MY CLUB COUTURE & GET EXCLUSIVE PERKS: 
EXCLUSIVE DISCOUNT: 25% OFF, Happy Mail, Exclusive Lives, Art Giveaways, and other benefits


Like these but not sure what Chalk Couture is- Click here to read all about it! 

Wanna shop for some Chalk Couture stuff? Click here to check out all the amazing items! 


And as always, help a sister out by sharing this post, like it and leave me a comment! 

Until then...


Tuesday, May 11, 2021

My take on May's Club Couture - Sweet Lemon Grove // Come chalk with me!

I absolutely loved this months Club Couture transfer! It's just perfect for spring and summer time! With a few different added in options, you could make this transfer in so many ways! 

You could place it in the kitchen and make a Lemon Drop! Sounds yummy! 


Ready to see how I made it? 

Step 1: Grab all your supplies that you will need. This makes it so much easier so you don't have to get up while chalking. I didn't use the trays since I have the jars of each chalk paste. Always stir your paste colors before you use them. If they feel a little dry, add a little bit of distilled water to it and stir well. 

Step 2: I used the main part of the transfer so I cut off the extra 2 pieces off. 

Step 3: Time to Fuzz Fuzz FUZZ! These newer transfers seem really sticky so fuzz it well so it doesn't stick too much to the surface. 


Step 4: Lay your transfer down onto your surface. Make sure its completely flat. 

Step 5: Make a game plan of where you want your paste colors to go. I went by the instructions and used the Storm Paste for the letters, the Lemon in Bumblebee Paste and the leaves and accent pieces in Meadow PasteI used the Small Squeegees for each paste color. Have your pastes close to you for easy use. 

Step 6: I started from the top and worked my way down. Once I chalked everything from the GROVE up, I used the paste and pull method. Thats when you lift up the portion of the transfer, so the paste doesn't dry out and mess up when you wait till the end to lift up the transfer. I laid the transfer back down carefully. I also pasted a little thick to give myself a little extra time. Then removed the extra paste right before I used the paste and pull method. 

Step 7: Lift up transfer and wash it off. The faster you wash it, the cleaner it will be. Use the Board Eraser to get it really clean, really easy. Its a great tool! After washing, lay it upside down so it can dry and you can put on the backing. These transfers are meant to be used 8-12 times each! But I have heard of people using them way more than that! Now clean your tools. During the chalking, I will wipe them will baby wipes, but when I am done, I just put them in a mason jar filled will water. These are easy to clean too. I've never even needed soap to clean them. 

Step 8: Display your awesome chalk art!

Here's a video on how I made it:

What Paste colors could you choose? There are so many options, the outcome possibilities are unlimited! 

What do you want to make your lemons into? 
A Lemon Drop sounds perfect to me!     

 Do you make stuff for your home? Let me know! I would love to hear all about it! 

What Is Chalk Couture?: https://youtu.be/nyosBF7gSxo
See how to create with Chalk Couture: https://youtu.be/jHLd2P2zqWo

SAVE 40% OFF EVERYTHING & JOIN MY TEAM AS A DESIGNER: 
What Is In The Kit: https://youtu.be/qiVdqk2RDdw

JOIN MY CLUB COUTURE & GET EXCLUSIVE PERKS: 
EXCLUSIVE DISCOUNT: 25% OFF, Happy Mail, Exclusive Lives, Art Giveaways, and other benefits


Like these but not sure what Chalk Couture is- Click here to read all about it! 


Wanna shop for some Chalk Couture stuff? Click here to check out all the amazing items! 


And as always, help a sister out by sharing this post, like it and leave me a comment! 

Until then...


Saturday, April 10, 2021

Welcome Sign // DIY Welcome sign // Come Chalk with Me!

This fun star tile pattern is repeatable on all four sides so you can cover a surface as large or small as you’d like. Add the “welcome” over the top of the tile or as an accent piece for home décor unlike any other. The tile pattern can be used for so many different things. What will you create?

While walking the aisles of Hobby Lobby, I came across some neat framed Screen frames on clearance, and I thought "I bet I could chalk on this!" So I bought a Square one and couldn't wait to chalk on it! 

Want to see how I made it? Follow along!


Supplies Needed: 
Found Surface: Square Screen Frame from Hobby Lobby
Washi Tape
Heat Gun (optional) 

Step 1
Get all your supplies together. Open the Bright White and Couture Teal Chalk Pastes and stir them well using a Stir Stick


Step 2
Fuzz the transfer using the Fuzzing Cloth. Don't be afraid to fuzz it alot. If it seems really sticky, it might need quite a few fuzzings. Since the new transfers seem to be stickier, fuzz fuzz FUZZ! You don't want that to pull up the back ground up when removing the transfer. 
Step 3
Cut the transfer apart. 
Step 4
Press the patterned part of the transfer onto the surface firmly. Since there was space on the outside of the transfer, place the wash tape on the outside of the transfer so the paste doesn't get in that space. Grab the Stir Stick and apply the Bright White Chalk Paste onto the transfer. Take the small squeegee and glide the Paste all over the transfer covering all mesh areas. Once fully chalked, pull the transfer from the top to bottom holding both ends, making sure to not stretch the transfer. Now since these new transfers seem to be more stickier that the older one, evenly pulling the transfer is important. 

Step 5
You can either let the pattern part air dry while you wash  the transfer or you can use a Heat Gun to speed up the process. 

Step 6
Once the pattern part is dry, lay your welcome part of the transfer in the middle of the patterned area. Take the small squeegee and glide the Couture Teal Paste all over the transfer covering mesh areas. Once fully chalked, pull the transfer from the top to bottom holding both ends, making sure to not stretch the transfer. Now since these new transfers seem to be more stickier that the older one, evenly pulling the transfer is important. 

Step 7
Clean your transfer right away. This will ensure more uses. To clean larger transfers, I clean them in the shower. Make sure the wall is clean and place the dirty transfer on there. Use the shower head to clean with cold water. Grab your board eraser and clean both sides. Once clean, hang or lay sticky side up until dry. Once dry, apply backer and store away. 


Now enjoy your creation! 

Watch me make it here: 

 Do you make stuff for your home? Let me know! I would love to hear all about it! 

What Is Chalk Couture?: https://youtu.be/nyosBF7gSxo
See how to create with Chalk Couture: https://youtu.be/jHLd2P2zqWo

SAVE 40% OFF EVERYTHING & JOIN MY TEAM AS A DESIGNER: 
What Is In The Kit: https://youtu.be/qiVdqk2RDdw

JOIN MY CLUB COUTURE & GET EXCLUSIVE PERKS: 
EXCLUSIVE DISCOUNT: 25% OFF, Happy Mail, Exclusive Lives, Art Giveaways, and other benefits


Like these but not sure what Chalk Couture is- Click here to read all about it! 


Wanna shop for some Chalk Couture stuff? Click here to check out all the amazing items! 


And as always, help a sister out by sharing this post, like it and leave me a comment! 

Until then...

Google Analytics

AUTO ADS BODY