Tuesday, February 1, 2022

February Club Couture- Take the long way home // Come chalk with me!

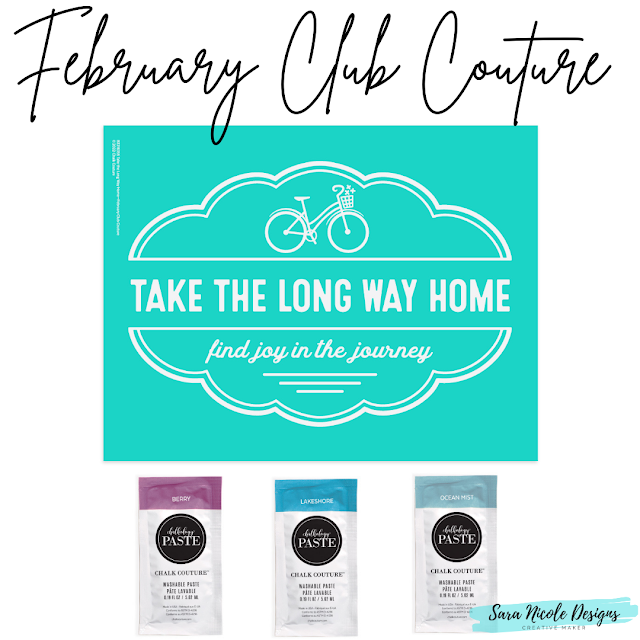
We want to ride our bicycles! February’s Club Couture Transfer is a reminder to enjoy the journey. With a vintage bicycle design, a dreamy bubble frame, and the sentiments “take the long way home” and “find joy in the journey”, this design will help you take the long way home. Your shipment this month also includes Berry, Lakeshore, and Ocean Mist Chalkology® Paste Singles.

Ready to start this months creation? Follow along! 

Supplies Included

Club Couture Chalk Transfer® design: Take the Long Way Home 

Chalkology® Paste Singles: Berry, Lakeshore, and Ocean Mist

Additional Supplies Needed

Surface: Aiden Style White Frame (9" × 12") 

Chalkology® Paste: Bright White

Tools: Color Trays, Fuzzing Cloth, Mini Squeegee, Multi-Tool, Detail Tool

Color and Placement Suggestions

Berry: bicycle basket, line elements

Bright White: bicycle, “take the long way home”

Lakeshore: flowers, “find joy in the journey” 

Ocean Mist: bubble frame


Follow these instructions to complete this project:

1. Remove your Transfer from its packaging and carefully peel off the Transfer Backer Sheet.

2. “Fuzz” the Transfer by gently pressing onto a Fuzzing Cloth and carefully pulling it upward. This will make the Transfer easier to remove from the surface after you’ve applied the paste.

3. Center the Take the Long Way Home Transfer on the surface, and smooth it out to ensure it has properly adhered and that there are no bubbles or wrinkles.

4. Knead your Chalkology Paste Singles. Cut open the corner of each packet and squeeze the desired amount of paste onto a Color Tray, using a new tray for each color.

5. With the curved edge of your Multi-Tool, thoroughly mix your jar of Bright White Chalkology Paste and scrape excess paste from the jar sides.

6. Use your tools to apply color over your Transfer (see “Color and Placement Suggestions”). Select your tool based on whichever size best fits the various elements you are chalking. Once the screen portions of the design are completely covered, use your tools to remove excess paste as evenly as possible; excess paste can be scraped back into the tray or jar. The more excess paste you remove, the better the result will be.

7. For best results, divide your project into sections and use the chalk-and-pull method. This allows you to work in smaller sections without having the paste dry in the screen, which would give you patchy results. Chalk the top section of the design and peel back only that portion of the Transfer to let the paste dry on the surface before continuing (use the Quick Dry Tool for a faster dry). To prevent any stretching in the Transfer, peel from the center or from both corners, instead of peeling diagonally.

8. Gently lay the Transfer back down over the chalked section. Ensure that the next section is fully adhered, and repeat these steps as you work your way down the Transfer.

9. Once your design is fully chalked and before the paste dries, remove your Transfer from the surface and immediately clean the Transfer with cool water (do not let it soak).

10. Dry the Transfer flat with the sticky side up. Once completely dry, reapply the Transfer Backer Sheet and store flat.

11. Display your latest creation and enjoy life’s journey!


Want to see a quick Video on how it is done? 

Watch this:
Not a Club Member yet?

Love your Club Couture membership, but want more to use them on? Get a Best Basics Chalk It Up Kit

Our basic instructions go like this: choose a surface and Transfer, add some paste or ink, and start creating. With the Best Basics Chalk It Up Kit, you’ll have what you need to carry out those instructions and you’ll be well on your way to artistry!

This kit includes two of our favorite surfaces: Board & Base (perfect for A-sized Transfers) and a Sylvie White Frame (perfect for B-sized Transfers). Both surfaces are reusable with Chalkology Paste, and can be used in either landscape or portrait orientation. Plus, that Board & Base is reversible so you can have two projects to display all at once!

What is your love language? I like to create things for the people I love! 

 Do you make stuff for your home? Let me know! I would love to hear all about it! 

What Is Chalk Couture?: https://youtu.be/nyosBF7gSxo
See how to create with Chalk Couture: https://youtu.be/jHLd2P2zqWo

SAVE 40% OFF EVERYTHING & JOIN MY TEAM AS A DESIGNER: 
What Is In The Kit: https://youtu.be/qiVdqk2RDdw

JOIN MY CLUB COUTURE & GET EXCLUSIVE PERKS: 
EXCLUSIVE DISCOUNT: 25% OFF, Happy Mail, Exclusive Lives, Art Giveaways, and other benefits


Like these but not sure what Chalk Couture is- Click here to read all about it! 


Wanna shop for some Chalk Couture stuff? Click here to check out all the amazing items! 


And as always, help a sister out by sharing this post, like it and leave me a comment! 

Until then...

Saturday, January 29, 2022

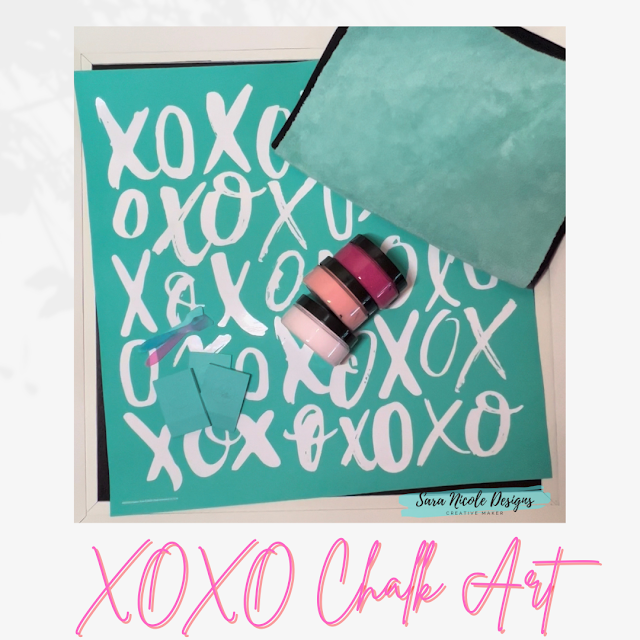
XOXO Valentines DIY Home Decor // Come chalk with me! // Time to get your crafts on!


Have you started decorating for Valentines Day yet? I have just started and I've had my eye on this transfer for a while. I decided to use 3 different pinks and combine them so it looks like a the-dye effect. 

Fun fact - According to Wikipedia: Hugs and kisses, abbreviated in North America as XO or XOXO, is an informal term used for expressing sincerityfaithlove, or good friendship at the end of a written letteremail or text message. In the United Kingdom, the phrase 'hugs and kisses' is widely used. 

Now lets get crafting! 

Step 1: Grab all your supplies that you will need. This makes it so much easier so you don't have to get up while chalking. Always stir your paste colors before you use them. If they feel a little dry, add a little bit of distilled water to it and stir well. 


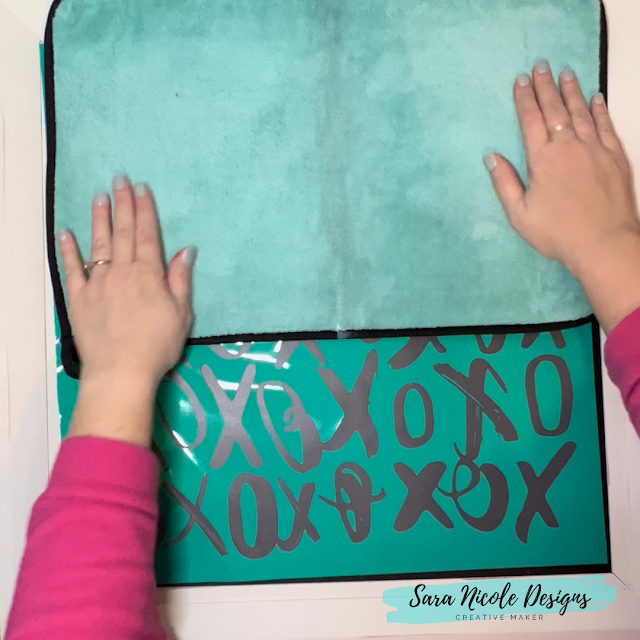
Step 2: Time to Fuzz Fuzz FUZZ! These newer transfers seem really sticky so fuzz it well so it doesn't stick too much to the surface. 

Step 3: Lay your transfer down onto your surface. Make sure it's completely flat.

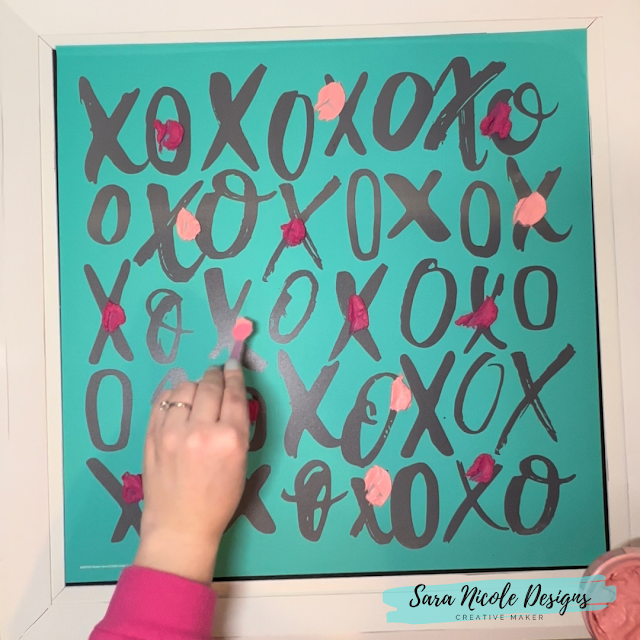
Step 4: I wanted a the-dye feel so I put the Chalk Paste Mauvelous, Raspberry Sorbet and Peony chalk paste all over the transfer in small smears. 

Step 5: Once you have enough paste all over the transfer, take a small squeegee and start to mix them all together.  If there is too much paste on the squeegee, just wipe it off and keep going. On other projects when doing this effect, I've actually put the excess mixed paste in a separate jar to use later. It's pretty cool the colors you can make when mixing paste together, 
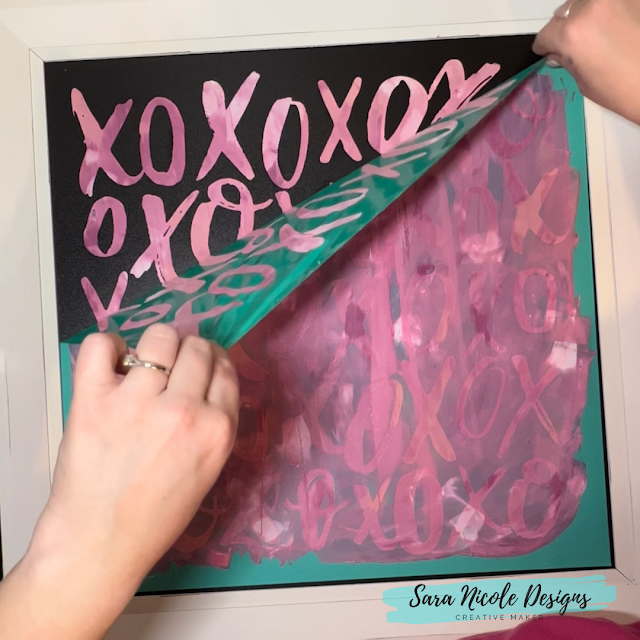
Step 6: One all done, lift up transfer and wash it off. The faster you wash it, the cleaner it will be. Use the Board Eraser to get it really clean, really easy. Its a great tool! After washing, lay it upside down so it can dry and you can put on the backing. These transfers are meant to be used 8-12 times each! But I have heard of people using them way more than that! Now clean your tools. During the chalking, I will wipe them will baby wipes, but when I am done, I just put them in a mason jar filled will water. These are easy to clean too. I've never even needed soap to clean them. 


Step 8: Display your awesome chalk art!

Check out these other Valentines Day Decor items:

What Paste colors could you choose? There are so many options, the outcome possibilities are unlimited! 

What are you making for your Valentine?

 Do you make stuff for your home? Let me know! I would love to hear all about it! 

What Is Chalk Couture?: https://youtu.be/nyosBF7gSxo
See how to create with Chalk Couture: https://youtu.be/jHLd2P2zqWo

SAVE 40% OFF EVERYTHING & JOIN MY TEAM AS A DESIGNER: 
What Is In The Kit: https://youtu.be/qiVdqk2RDdw

JOIN MY CLUB COUTURE & GET EXCLUSIVE PERKS: 
EXCLUSIVE DISCOUNT: 25% OFF, Happy Mail, Exclusive Lives, Art Giveaways, and other benefits


Like these but not sure what Chalk Couture is- Click here to read all about it! 


Wanna shop for some Chalk Couture stuff? Click here to check out all the amazing items! 


And as always, help a sister out by sharing this post, like it and leave me a comment! 

Until then...


Tuesday, January 25, 2022

January Club Couture - Love - Styled by me! // Come chalk with me!

 I love all the colors of Valentines Day, so I was super excited to create this months Club Couture! I have so many Chalk Pastes in Reds and pinks, it was really hard to chose. After pulling all the reds and picks out and comparing them with each other, I picked Bright White, Mauvelous and Raspberry Sorbet

Come along and see how I styled this months Club Couture - Love! 


Step 1: Grab all your supplies that you will need. This makes it so much easier so you don't have to get up while chalking. Always stir your paste colors before you use them. If they feel a little dry, add a little bit of distilled water to it and stir well. 


Step 2: Time to Fuzz Fuzz FUZZ! These newer transfers seem really sticky so fuzz it well so it doesn't stick too much to the surface. 

Step 3: Lay your transfer down onto your surface. Make sure its completely flat.


Step 4: I wanted an Ombre feel for the words LOVE and DIRECTION. I put the Chalk Paste Mauvelous on the top half of the word and  Raspberry Sorbet on the bottom half. I use my finger and slightly blend them together in the middle section. This makes a pretty ombre effect. 


Step 5: For the rest of the words, I used Bright White. Just to make sure the paste didn't try in the screen, I used the paste and pull method. Since I was doing the word DIRECTION in ombre too, thats where I decided to stop to the paste and pull. 


Step 6: For the word DIRECTION, I put the Chalk Paste Mauvelous on the top half of the word and  Raspberry Sorbet on the bottom half. I use my finger and slightly blend them together in the middle section. 

Step 7: Lift up transfer and wash it off. The faster you wash it, the cleaner it will be. Use the Board Eraser to get it really clean, really easy. Its a great tool! After washing, lay it upside down so it can dry and you can put on the backing. These transfers are meant to be used 8-12 times each! But I have heard of people using them way more than that! Now clean your tools. During the chalking, I will wipe them will baby wipes, but when I am done, I just put them in a mason jar filled will water. These are easy to clean too. I've never even needed soap to clean them. 
Step 8: Display your awesome chalk art!

What Paste colors could you choose? There are so many options, the outcome possibilities are unlimited! 

What are you making for your Valentine?

 Do you make stuff for your home? Let me know! I would love to hear all about it! 

What Is Chalk Couture?: https://youtu.be/nyosBF7gSxo
See how to create with Chalk Couture: https://youtu.be/jHLd2P2zqWo

SAVE 40% OFF EVERYTHING & JOIN MY TEAM AS A DESIGNER: 
What Is In The Kit: https://youtu.be/qiVdqk2RDdw

JOIN MY CLUB COUTURE & GET EXCLUSIVE PERKS: 
EXCLUSIVE DISCOUNT: 25% OFF, Happy Mail, Exclusive Lives, Art Giveaways, and other benefits


Like these but not sure what Chalk Couture is- Click here to read all about it! 


Wanna shop for some Chalk Couture stuff? Click here to check out all the amazing items! 


And as always, help a sister out by sharing this post, like it and leave me a comment! 

Until then...

Saturday, January 22, 2022

Valentines Transfers just in time for all your Valentines Day crafts! // Come craft with me!

These transfers will make fall in love with decorating your home for Valentines Day. These can be used on all types of items in your home. What is your favorite transfer? 

SKU: A2143163
  
$9.99 USD


Not much of a people person? We've got the purrrrfect Chalk Transfer® design for you! With an adorable heart and a cozy reclined kitten, our 5½” x 7½” I Hate You The Least Transfer will enigmatically declare the love you have for your furbaby. Pair this Transfer with our Pallet Sign (item S191103) for an adorable look.


SKU: B2143198
  
$14.99 USD


Don’t know how to show your love this Valentine’s Day? We’ve got you covered. Our cut-apart 11” x 8½” Hugs & Kisses XOXO Chalk Transfer® design delivers the sweetest message. Pick your choice of “XOXO” in a word bubble, “Hugs & Kisses”, or highlight Valentine’s Day with a sweet little February 14 sentiment. This was designed specially to fit on our Block Set (item S2131112) and also looks great on our Simple Shapes (item S2111104) and Simple Shapes Rectangle (item S2131114). 
SKU: A2143161
  
$9.99 USD


Share a big smooch this Valentine's Day with our Valentine Kisses Chalk Transfer® design. Wow your Valentine by using the various elements in this adorable, cut-apart Transfer on our Couture Boutique™ Board & Base (item S203109). Chalk tip: the luscious kiss mark is one of our favorite corner accents for any project! For a classy and sassy look, we recommend Chalkology® Paste in Candy Apple (item P181112) and Shimmer Shadow (item P203131).
SKU: B2143199
  
$14.99 USD


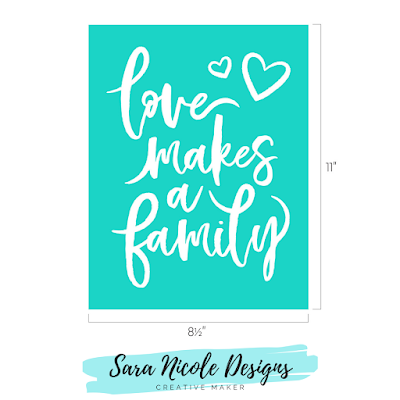
Here at Chalk Couture, we know family is of the utmost importance! That’s why we love our Chalk Couture family so much. With the most important message, our 8½” x 11” Love Makes A Family Chalk Transfer® design features two adorable hearts and a stylish hand-drawn look. Chalk tip: we love using this Transfer on our 9” x 12” Sylvie White Frame (item S193102). Chalk this easily in one color for a one-and-done project, or add extra colors to match your scheme. This fun design is great to show off all year long. 
SKU: B2143203
  
$14.99 USD

Excited for the spring season? We’ve captured that feeling in our adorable farmhouse jars! Our 11” x 8 ½” Jar Cutouts Bloom Chalk Transfer® design features two outlined jars and the sentiments of “follow your heart” and “bloom & grow”. We’ve also created the perfect surface for this Transfer. Pair Jar Cutouts Bloom with our 5” x 8” Jar Cutouts (item S2153120). Chalk tip: for an a-mason look, paint our Jar Cutouts in Ocean Mist (item P181103) Chalkology® Paste and chalk the jar border in Bright White (item P181121).


SKU: B2143202
  
$14.99 USD


When you have love, what else do you need? You need cute Chalk Transfer® designs, that’s what! Highlighting the words from a much-loved Beatles song, this Transfer will grant you all the warm fuzzy feelings for Spring. The adorable floral elements in this Transfer create beautiful crafts that you will fall in love with over and over again. We love applying a watercolor technique to the cute flowers and leaves. For a great look, use the 8½” x 11” All You Need Is Love Transfer on our 9” x 12” Double-Sided Box Frame (item S203106).

SKU: C2143161
  
$24.99 USD


Spread springtime joy by chalking it up with this gorgeous Chalk Transfer® design! Our 12” x 18” Let Your Heart Be Glad Transfer is the perfect addition to your spring clean-up look! Featuring modern styled peonies and beautiful swirling lettering, this Transfer will transport you directly to a luscious peony-filled garden. Our Let Your Heart Be Glad Chalk Transfer design transfer fits perfectly on our Reclaimed Diagonal Pallet (item S193107) or Couture Gallery™ Aiden Style White Frame (item S183125).


I can't wait get my craft on these upcoming weeks for valentines day crafts!

 Want to read more on Club Couture and how it works? Click here to read my post all about Club Couture and how it works. 

What Is Chalk Couture?: https://youtu.be/nyosBF7gSxo
See how to create with Chalk Couture: https://youtu.be/jHLd2P2zqWo

SAVE 40% OFF EVERYTHING & JOIN MY TEAM AS A DESIGNER: 
What Is In The Kit: https://youtu.be/qiVdqk2RDdw

JOIN MY CLUB COUTURE & GET EXCLUSIVE PERKS: 
EXCLUSIVE DISCOUNT: 25% OFF, Happy Mail, Exclusive Lives, Art Giveaways, and other benefits


Like these but not sure what Chalk Couture is- Click here to read all about it! 


Wanna shop for some Chalk Couture stuff? Click here to check out all the amazing items! 


And as always, help a sister out by sharing this post, like it and leave me a comment! 

Until then...

Google Analytics

AUTO ADS BODY